 Hyundai Veloster: Shift Lever > Repair procedures
Hyundai Veloster 2011-2017 Service Manual / Dual Clutch Transmission(DCT) System / Dual Clutch Transmission Control System / Shift Lever > Repair procedures
Hyundai Veloster: Shift Lever > Repair procedures
Hyundai Veloster 2011-2017 Service Manual / Dual Clutch Transmission(DCT) System / Dual Clutch Transmission Control System / Shift Lever > Repair procedures
Removal
| 1. |
Remove the floor console assembly.
(Refer to the Interior (Console) of BD Group.)
|
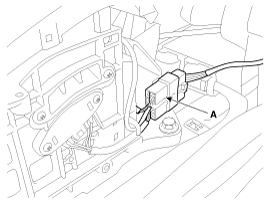
| 2. |
Disconnect the sports mode connector (A).
|
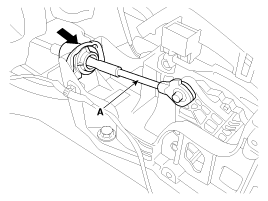
| 3. |
Remove the control cable (A).
|
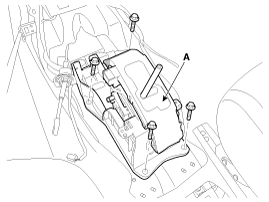
| 4. |
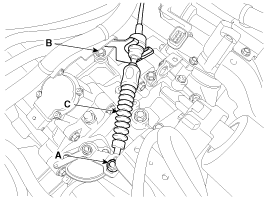
Remove the bolt and then the shift lever assembly (A).
|
Installation
| 1. |
Installation is the reverse of removal.
|
Changing the Shift Cable
| 1. |
Remove the floor console assembly.
(Refer to the Interior (Console) of BD Group.)
|
| 2. |
Remove the control cable (A).
|
| 3. |
Remove the retainer (A) and nut (B).
|
| 4. |
Remove the cable (B) from the cable bracket (A) on the A/T.
|
| 5. |
Remove the nut (C) from the manual control lever.
|
| 6. |
Remove the shift cable by pulling it toward the interior.
|
| 7. |
Installation is the reverse of removal.
|
Adjustment
| Adjusting the Control Cable |
| 1. |
Place the shift lever in the interior, and the transmission manual
control lever, to the N position.
|
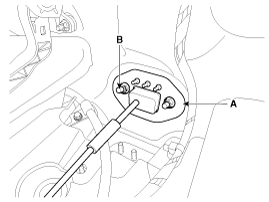
| 2. |
Connect the shift lever (A) in the interior with the control cable
(B).
|
| 3. |
Lightly push the shift cable towards F to tighten the cable.
|
| 4. |
Tighten the nut (A) to the specified torque.
|

 Shift Lever > Components and Components Location
Components
1. Shift lever knob
2. Shift lever assembly
3. Control cable assembly
...
 Gear Actuator > Components and Components Location
Component Location
1. Gear actuator
2. DCT(Dual Clutch Transmission)
...
See also:
Hood. Repair procedures
Replacement
Hood Assembly Replacement
•
When removing and installing the hood, an
assis ...
Steering Gear box. Components and Components Location
Components
1. Tie-rod end
2. Lock nut
3. Bellows clip
4. Bellows
5. Tie rod
6. Rack bar
7. Dust packing
8. Dust cap
9. Oil seal
10. Pinion plug
...
Manual climate control system
1. Turn the ignition switch to the ON position. 2. Select the defrost button
(). 3. Press the air intake control
button at least 5 times within 3 seconds.
The indicator on the air intake button ...
Categories
- Hyundai Veloster Manuals Home
- Hyundai Veloster 2010-2017 Owner's Manual
- Hyundai Veloster 2010-2017 Service Manual
