 Hyundai Veloster: ESC Control Module. Repair procedures
Hyundai Veloster 2011-2017 Service Manual / Brake System / ESC(Electronic Stability Control) System / ESC Control Module. Repair procedures
Hyundai Veloster 2011-2017 Service Manual / Brake System / ESC(Electronic Stability Control) System / ESC Control Module. Repair procedures
Removal
| 1. |
Turn ignition switch OFF.
|
| 2. |
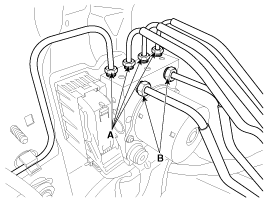
Disconnect the brake tubes from the HECU by unlocking the nuts
counterclockwise with a spanner.
|
| 3. |
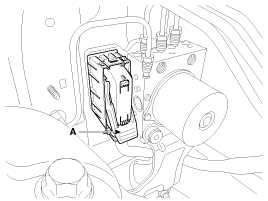
Pull up the lock of the HECU connector (A), and then disconnect
the connector.
|
| 4. |
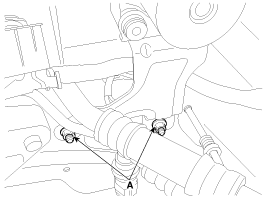
Loosen the HECU bracket nuts (A), then remove HECU and bracket.
|
| 5. |
Remove the 3 bolts, and then remove the bracket from HECU.
|
Installation
| 1. |
Installation is the reverse of removal.
|
| 2. |
Tighten the HECU mounting bolts and nuts to the specified torque.
|
| 3. |
After installation, bleed the
(Refer to ABS bleeding)
|
 ESC Control Module. Components and Components Location
Components
1. Front - left tube
2. Rear - right tube
3. Rear - left tube
4. Front - right tube
5. MC2
6. MC1
7. ESC control module (HECU)
8. Damper
...
 Front Wheel Speed Sensor. Components and Components Location
Components
1. Front wheel speed sensor
2. Front wheel speed sensor connector
...
See also:
Power Window Switch. Repair procedures
Inspection
Power Window Main Switch Inspection
1.
Disconnect the negative (-) battery terminal.
2.
Remove the front door trim panel.
...
DCT Control Modle (TCM) > Description and Operation
Description
The Transmission Control Module (TCM) is like the brain for the DCT. It
receives information from various sensors for a wide range of transmission controls
to provide an optimal ...
Components and Components Location
Components Location
1. AVN (A/V & Navigation head unit)
2. Midrange speaker
3. External amplifier
4. Glass antenna amplifier (Radio)
5. Front door speaker
6. Rea ...
Categories
- Hyundai Veloster Manuals Home
- Hyundai Veloster 2010-2017 Owner's Manual
- Hyundai Veloster 2010-2017 Service Manual
© 2011-2025 Copyright www.hvmanual.com


