 Hyundai Veloster: Yaw-rate and Lateral G Sensor. Repair procedures
Hyundai Veloster 2011-2017 Service Manual / Brake System / ESC(Electronic Stability Control) System / Yaw-rate and Lateral G Sensor. Repair procedures
Hyundai Veloster: Yaw-rate and Lateral G Sensor. Repair procedures
Hyundai Veloster 2011-2017 Service Manual / Brake System / ESC(Electronic Stability Control) System / Yaw-rate and Lateral G Sensor. Repair procedures
Hyundai Veloster 2011-2017 Service Manual / Brake System / ESC(Electronic Stability Control) System / Yaw-rate and Lateral G Sensor. Repair procedures
Removal
| 1. |
Turn ignition switch OFF and disconnect the negative (-) battery
cable.
|
| 2. |
Remove the passenger seat assembly.
(Refer to the Body group - "Seat")
|
| 3. |
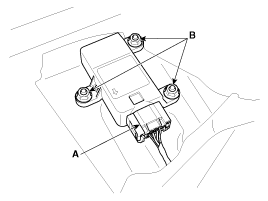
Disconnect the yaw rate & lateral G sensor connector (A).
|
| 4. |
Remove the mounting bolts (B).
|
| 5. |
Installation is the reverse of removal.
|
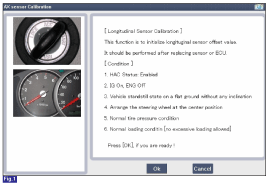
| ■ longitudinal G sensor Calibration |
| 1. |
IG ON, ENG OFF
|
| 2. |
Stand the vehicle on a flat ground without any inclination.
|
| 3. |
Set the steering wheel at the center position.
|
| 4. |
Keep the vehicle under normal tire pressure condition and normal
loading condition.
|
| 5. |
Connect GDS to Data Link Connector(DLC).
|
| 6. |
Perform Longitudinal G Sensor Calibration.(figure 1).
|
| 7. |
Confirm success or failure of calibration.
|
 Yaw-rate and Lateral G Sensor. Description and Operation
Description
When the vehicle is turning with respect to a vertical axis the yaw rate
sensor detects the yaw rate electronically by the vibration change of plate
fork inside the yaw rate sens ...
 ESC OFF Switch. Description and Operation
Description
1.
The ESC OFF switch is for the user to turn off the ESC system.
2.
The ESC OFF lamp is on when ESC OFF switch is engaged.
...
See also:
Special Service Tools
Special Tools
Tool (Number and name)
Illustration
Use
09793-21000
Door hinge adjusting wrench
Adjustment, removal ...
Special Service Tools
Special Service Tools
Tool (Number and Name)
Illustration
Use
Deployment tool
0957A-34100A
Airbag deployment tool.
...
Warnings and indicators
All warning lights are checked by turning the ignition switch ON (do not start
the engine). Any light that does not illuminate should be checked by an authorized
HYUNDAI dealer.
After starting th ...
Categories
- Hyundai Veloster Manuals Home
- Hyundai Veloster 2010-2017 Owner's Manual
- Hyundai Veloster 2010-2017 Service Manual

© 2011-2026 Copyright www.hvmanual.com