 Hyundai Veloster: Clutch Pedal. Repair procedures
Hyundai Veloster 2011-2017 Service Manual / Clutch System / Clutch System / Clutch Pedal. Repair procedures
Hyundai Veloster: Clutch Pedal. Repair procedures
Hyundai Veloster 2011-2017 Service Manual / Clutch System / Clutch System / Clutch Pedal. Repair procedures
Hyundai Veloster 2011-2017 Service Manual / Clutch System / Clutch System / Clutch Pedal. Repair procedures
Inspection
| Clutch Pedal Inspection |
| 1. |
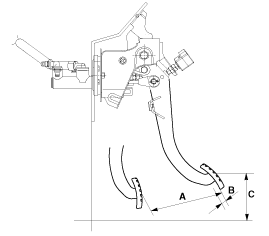
Measure the clutch pedal height (from the face of the pedal pad
to the floor board) and the clutch pedal clevis pin play (measured at
the face of the pedal pad.)
|
| Ignition Lock Switch Inspection |
| 1. |
Disconnect 2P-connector from a ignition lock switch.
|
| 2. |
Disconnect the ignition lock switch. (if you can install a tester
with the switch fixed, this step can be omissible)
|
| 3. |
Check for continuity between terminals. (refer to the table below)
|

Removal
|
| 1. |
Remove the battery and ECM.
(Refer to "Manual transaxle system" in MT group)
|
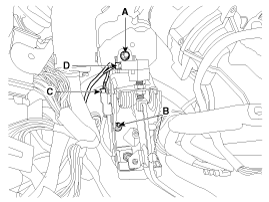
| 2. |
Disconnect the clutch tube (B) and reservoir hose (A) from the
clutch master cylinder.
|

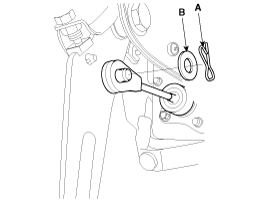
| 3. |
Disconnect the push rod from the master cylinder by removing the
snap pin (A) and washer (B).
|
| 4. |
Remove the clutch pedal mounting bolt (A) and nuts (B-2ea).
|
| 5. |
Disconnect the ignition lock switch connector (C) and clutch switch
connector (B).
|
| 6. |
Remove the clutch pedal and the master cylinder assembly together.
|
Installation
| 1. |
Installation is in reverse order of removal.
|
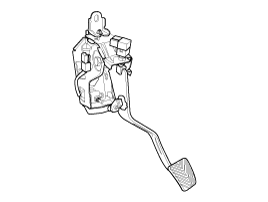
 Clutch Pedal. Components and Components Location
Components
1. Reverse hose
2. Master cylinder
3. Ignition lock switch
4. Clutch switch
5. Clutch arm assembly
6. Pedal pad
...
 Clutch Release Cylinder. Components and Components Location
Components
1. Union bolt
2. Gasket
3. Tube joint
4. Clutch tube
5. Valve plate
6. Valve spring
7. Bleeder screw
8. Release cylinder
9. Return sprin ...
See also:
Heated Oxygen Sensor (HO2S). Troubleshooting
Signal Waveform
...
Steering Column and Shaft. Repair procedures
Replacement
1.
Disconnect the battery negative cable from the battery and then
wait for at least 30 seconds.
2.
Turn the steering wheel so ...
Components and Components Location
Component Location
1. IPM
2. Ultrasonic sensor
3. Rear parking assist switch (OFF)
※ The IPM contains the rear parking assist system ...
Categories
- Hyundai Veloster Manuals Home
- Hyundai Veloster 2010-2017 Owner's Manual
- Hyundai Veloster 2010-2017 Service Manual

© 2011-2026 Copyright www.hvmanual.com