 Hyundai Veloster: Power Window Motor. Repair procedures
Hyundai Veloster 2011-2017 Service Manual / Body Electrical System / Power Windows / Power Window Motor. Repair procedures
Hyundai Veloster: Power Window Motor. Repair procedures
Hyundai Veloster 2011-2017 Service Manual / Body Electrical System / Power Windows / Power Window Motor. Repair procedures
Hyundai Veloster 2011-2017 Service Manual / Body Electrical System / Power Windows / Power Window Motor. Repair procedures
Inspection
Front Power Window Motor Inspection
| 1. |
Remove the front door trim panel.
(Refer to the BD group - "Front door")
|
| 2. |
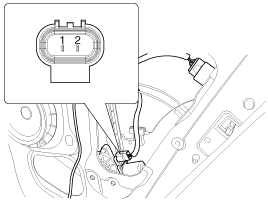
Disconnect the connector from the motor.
[Driver]
[Assistant]
|
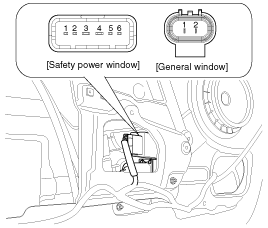
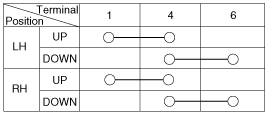
| 3. |
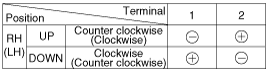
Connect the motor terminals No.2 and No.3 directly to battery
voltage (12V) and connect the motor terminal No.4 to ground (0V).
Check that the motor operates smoothly.
If the operation is abnormal, replace the motor.
[Safety Power Window]
|
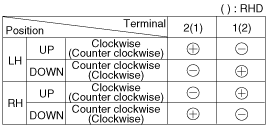
| 4. |
Connect the motor terminals directly to battery voltage (12V)
and check that the motor operates smoothly. Next, reverse the polarity
and check that the motor operates smoothly in the reverse direction.
If the operation is abnormal, replace the motor.
[General Window]
|
Rear Power Window Motor Inspection
| 1. |
Remove the rear door trim panel.
(Refer to the BD group - "Rear door")
|
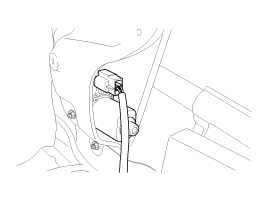
| 2. |
Disconnect the 2P connector from the motor.
|
| 3. |
Connect the motor terminals directly to battery voltage (12V)
and check that the motor operates smoothly. Next, reverse the polarity
and check that the motor operates smoothly in the reverse direction.
If the operation is abnormal, replace the motor.
|
 Power Window Motor. Schematic Diagrams
Circuit Diagram
...
 Power Window Switch. Schematic Diagrams
Circuit Diagram
Driver Power Window Switch
Passenger power window switch
Rear power window switch
...
See also:
Seat Heater. Repair procedures
Inspection
First Seat Heater
1.
Check for continuity and measure the resistance between terminals.
[Cushion]
No.
...
Components and Components Location
Component Location
1. Panoramaroof
2. Panoramaroof switch
3. Panoramaroof motor & controller
4. Roller blind motor & slave controller
...
Rear Washer Switch. Repair procedures
Inspection
Check for continuity between the terminals while operating the wiper and
washer switch. If it is not normal condition, replace wiper and washer switch.
Rear Wiper Switch
...
Categories
- Hyundai Veloster Manuals Home
- Hyundai Veloster 2010-2017 Owner's Manual
- Hyundai Veloster 2010-2017 Service Manual

© 2011-2026 Copyright www.hvmanual.com