Replacement
Floor Console Replacement
| •
|
A plastic trim tool is recommended, but if
prying with a screwdriver, wrap it with protective tape, and
apply protective tape around the related parts, to prevent damage.
|
| •
|
Put on gloves to protect your hands.
|
|
|
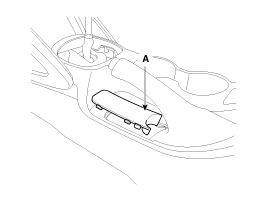
1. |
Using a screwdriver or remover, remove the parking
brake cover (A).
|
|
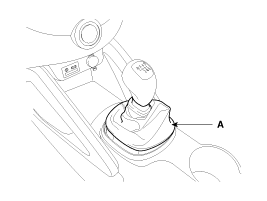
2. |
Using a screwdriver or remover, remove the gear boots
(A).
|
|
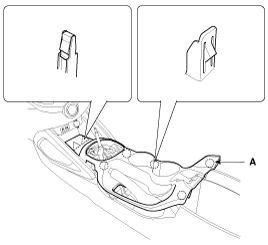
3. |
Using a screwdriver or remover, remove the console
upper cover (A).
|
|
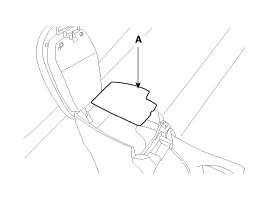
4. |
Remove the console tray mat (A).
|
|
5. |
After loosening the mounting screws and bolts, then
remove the floor console assembly (A).
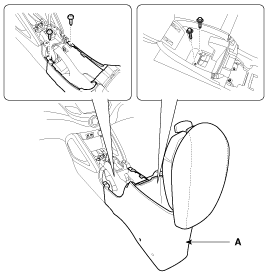
|
|
6. |
After loosening the mounting clips and screws, then
remove the console side cover (A).
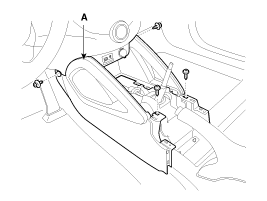
|
|
7. |
Installation is the reverse of removal.
|
• |
Make sure the connector are connected
in properly.
|
|
• |
Replace any damage clips.
|
|
|
| •
|
A plastic trim tool is recommended, but if
prying with a screwdriver, wrap it with protective tape, and
apply protective tape around the related parts, to prevent damage.
|
| •
|
Put on gloves to protect your hands.
|
|
|
1. |
Using a screwdriver or remover, remove the parking
brake cover (A).
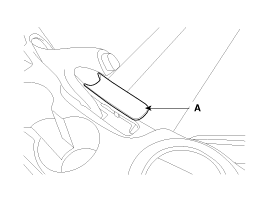
|
|
2. |
Using a screwdriver or remover, remove the console
upper cover (A).
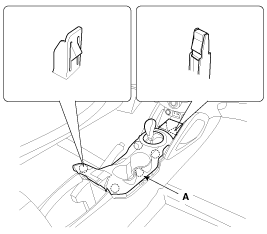
|
|
3. |
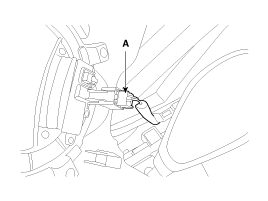
Disconnect the connector (A).
|
|
4. |
Remove the console tray mat (A).

|
|
5. |
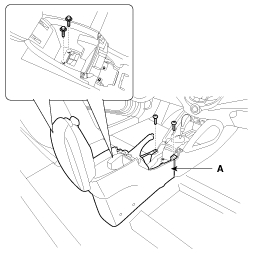
After loosening the mounting screws and bolts, then
remove the floor console assembly (A).
|
|
6. |
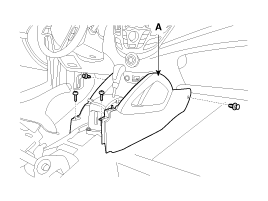
After loosening the mounting clips and screws, then
remove the console side cover (A).
|
|
7. |
Installation is the reverse of removal.
|
• |
Make sure the connectors are connected
in properly.
|
|
• |
Replace any damaged clips.
|
|
|
Rear Console Cover Replacement
| •
|
A plastic trim tool is recommended, but if
prying with a screwdriver, wrap it with protective tape, and
apply protective tape around the related parts, to prevent damage.
|
| •
|
Put on gloves to protect your hands.
|
|
|
1. |
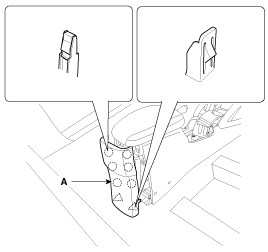
Using a screwdriver or remover, remove the rear console
cover (A).
|
|
2. |
Installation is the reverse of removal.
|
• |
Replace any damage clips.
|
|
|
Armrest assembly Replacement
| •
|
A plastic trim tool is recommended, but if
prying with a screwdriver, wrap it with protective tape, and
apply protective tape around the related parts, to prevent damage.
|
| •
|
Put on gloves to protect your hands.
|
|
|
1. |
Using a screwdriver or remover, remove the rear console
cover (A).
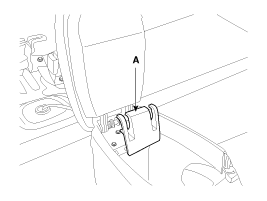
|
|
2. |
After loosening the mounting screws, then remove
the armrest assembly (A).
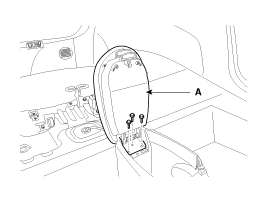
|
|
3. |
Installation is the reverse of removal.
|
• |
Replace any damage clips.
|
|
|
Components
1. Floor console assembly
2. Console upper cover [M/T]
3. Console upper cover [A/T]
4. Parking brake cover
5. Ash tray assembly
6. Floor console r ...
Components
1. Main crash pad assembly
2. Center speaker grille
3. Center speaker assembly
4. Photo sensor
5. Cluster fascia lower panel
6. Cluster fascia upper panel ...
See also:
Brake Pedal. Components and Components Location
Components
1. Cowl bracket
2. Brake pedal member assembly
3. Stop lamp switch
4. Return spring
5. Brake pedal
6. Brake pedal pad
...
Before starting
Close and lock all doors.
Position the seat so that all controls are easily reached.
Adjust the inside and outside rearview mirrors.
Be sure that all lights work.
Check all gauges.
Check ...
Passenger Airbag (PAB) Module. Description and Operation
Description
The passenger airbag (PAB) is installed inside the crash pad and protects
the front passenger in the event of a frontal crash. The SRSCM determines if
and when to deploy the PAB. ...
 Hyundai Veloster: Console. Repair procedures
Hyundai Veloster 2011-2017 Service Manual / Body (Interior and Exterior) / Interior / Console. Repair procedures
 Console. Components and Components
Location
 Crash Pad. Components and Components
Location


