 Hyundai Veloster: Sub Frame. Repair procedures
Hyundai Veloster 2011-2017 Service Manual / Suspension System / Front Suspension System / Sub Frame. Repair procedures
Hyundai Veloster: Sub Frame. Repair procedures
Hyundai Veloster 2011-2017 Service Manual / Suspension System / Front Suspension System / Sub Frame. Repair procedures
Hyundai Veloster 2011-2017 Service Manual / Suspension System / Front Suspension System / Sub Frame. Repair procedures
Replacement
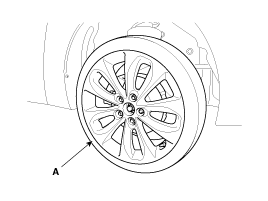
| 1. |
Remove the front wheel & tire.
|
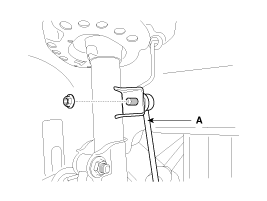
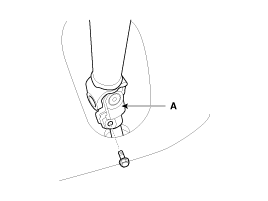
| 2. |
Disconnect the stabilizer link (B) with the front strut assembly
(A) after loosening the nut.
|
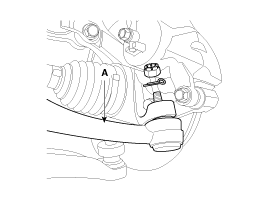
| 3. |
Loosen the nut and then remove the tie-rod end (A) with the front
axle (B).
|
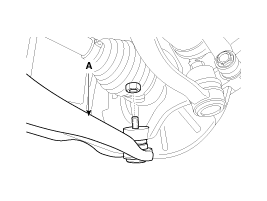
| 4. |
Loosen the nut and then remove the lower arm (A).
|
| 5. |
Loosen the bolt (A) and then disconnect the universal joint assembly
from the pinion of the steering gear box.
|
| 6. |
Remove the rubber hanger (A).
|
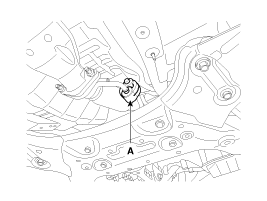
| 7. |
Loosen the roll rod (A) mounting bolts and nuts.
|
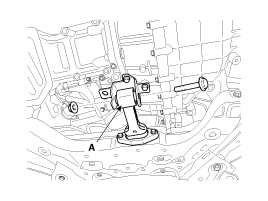
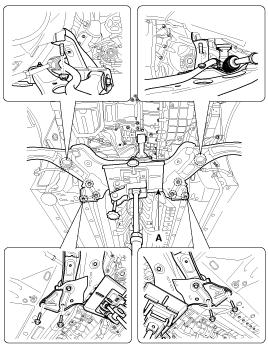
| 8. |
Loosen the bolts & nuts and then remove the front sub frame (A).
|
| 9. |
Remove the lower arm.
(Refer to SS group - "Lower Arm")
|
| 10. |
Remove the stabilizer bar.
(Refer to SS group - Stabilizer Bar")
|
| 11. |
Remove the steering gear box.
(Refer to ST group - "Steering Gear Box")
|
| 12. |
Installation is the reverse of removal.
|
| 13. |
Check the wheel alignment.
(Refer to SS group - "Tires/Wheels")
|
 Front Stabilizer Bar. Repair procedures
Replacement
1.
Remove the front wheel & tire.
Tightening torque :
88.3 ~ 107.9N.m(9.0 ~ 11.0kgf.m, 65.1 ~ 79.6lb-ft)
...

See also:
TPMS Receiver. Description and Operation
Description
Function
1.
LED control, Vehicle Speed signal enter, Diagnostic function (via
HS CAN Communications)
2.
Self Diagnos ...
Starting the engine
WARNING
Always wear appropriate shoes when operating your vehicle. Unsuitable shoes
(high heels, ski boots, etc.) may interfere with your ability to use the brake,
accelerator and clutch pedal (i ...
Aux, USB and iPod® port
If your vehicle has an aux and/or USB(universal serial bus) port or iPod port,
you can use an aux port to connect audio devices and a USB port to plug in a USB,
or use the HYUNDAI accessory ipod ...
Categories
- Hyundai Veloster Manuals Home
- Hyundai Veloster 2010-2017 Owner's Manual
- Hyundai Veloster 2010-2017 Service Manual

© 2011-2026 Copyright www.hvmanual.com