 Hyundai Veloster: Engine Control Module (ECM). Repair procedures
Hyundai Veloster 2011-2017 Service Manual / Fuel System / Engine Control System / Engine Control Module (ECM). Repair procedures
Hyundai Veloster: Engine Control Module (ECM). Repair procedures
Hyundai Veloster 2011-2017 Service Manual / Fuel System / Engine Control System / Engine Control Module (ECM). Repair procedures
Hyundai Veloster 2011-2017 Service Manual / Fuel System / Engine Control System / Engine Control Module (ECM). Repair procedures
Removal
When replacing the ECM, the vehicle equipped with immobilizer
must be performed the procedure as below.
[In the case of installing used ECM]
Then the ECM key register process is completed automatically.
[In the case of installing new ECM]
Then the ECM key register process is completed automatically.
|
| 1. |
Turn ignition switch OFF and disconnect the negative (-) battery
cable.
|
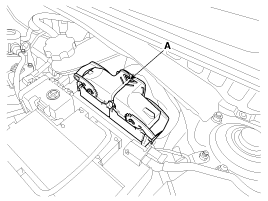
| 2. |
Disconnect the ECM Connector (A).
|
| 3. |
Remove the battery (Refer to "Charging System" in EM group).
|
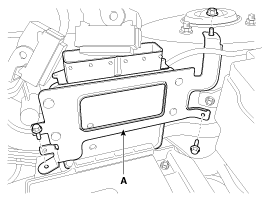
| 4. |
Remove the mounting bolts and nut, and then remove the ECM bracket
assembly (A).
|
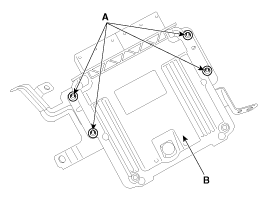
| 5. |
Remove the ECM (B) after removing 4 nuts (A) from the bracket.
|
Installation
When replacing the ECM, the vehicle equipped with immobilizer
must be performed the procedure as below.
[In the case of installing used ECM]
Then the ECM key register process is completed automatically.
[In the case of installing new ECM]
Then the ECM key register process is completed automatically.
|
| 1. |
Installation is reverse of removal.
|
ECM Problem Inspection Procedure
| 1. |
TEST ECM GROUND CIRCUIT: Measure resistance between ECM and chassis
ground using the backside of ECM harness connector as ECM side check
point. If the problem is found, repair it.
|
| 2. |
TEST ECM CONNECTOR: Disconnect the ECM connector and visually
check the ground terminals on ECM side and harness side for bent pins
or poor contact pressure. If the problem is found, repair it.
|
| 3. |
If problem is not found in Step 1 and 2, the ECM could be faulty.
If so, make sure there were no DTC's before swapping the ECM with a
new one, and then check the vehicle again. If DTC's were found, examine
this first before swapping ECM.
|
| 4. |
RE-TEST THE ORIGINAL ECM: Install the original ECM (may be broken)
into a known-good vehicle and check the vehicle. If the problem occurs
again, replace the original ECM with a new one. If problem does not
occur, this is intermittent problem (Refer to “Intermittent Problem
Inspection Procedure” in Basic Inspection Procedure).
|
 Engine Control Module (ECM). Schematic Diagrams
Harness Connector
ECM Terminal Function
Connector [EGGM-A]
Pin No.
Description
Connected to
1
Injector (Cylinder #3) ...
 ETC (Electronic Throttle Control) System. Description and Operation
Description
The Electronic Throttle Control (ETC) System consists of a throttle body
with an integrated control motor and throttle position sensor (TPS). Instead
of the traditional throttle ...
See also:
Components and Components Location
Component Location
1. IPM
2. Ultrasonic sensor
3. Rear parking assist switch (OFF)
※ The IPM contains the rear parking assist system ...
Engine start/stop button position
OFF
• with manual transaxle
To turn off the engine, stop the vehicle then press the engine start/stop button
with the engine start/stop button ON.
• with DCT
To turn off the engine, press th ...
Head Lamps. Repair procedures
Removal
1.
Disconnect the negative (-) battery terminal.
2.
Remove the front bumper.
(Refer to the BD group - "Front bumper") ...
Categories
- Hyundai Veloster Manuals Home
- Hyundai Veloster 2010-2017 Owner's Manual
- Hyundai Veloster 2010-2017 Service Manual

© 2011-2026 Copyright www.hvmanual.com