 Hyundai Veloster: Canister. Repair procedures
Hyundai Veloster 2011-2017 Service Manual / Emission Control System / Evaporative Emission Control System / Canister. Repair procedures
Hyundai Veloster: Canister. Repair procedures
Hyundai Veloster 2011-2017 Service Manual / Emission Control System / Evaporative Emission Control System / Canister. Repair procedures
Hyundai Veloster 2011-2017 Service Manual / Emission Control System / Evaporative Emission Control System / Canister. Repair procedures
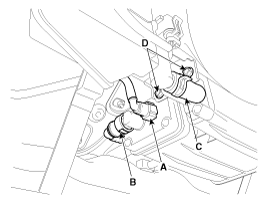
Removal
| 1. |
Turn the ignition switch OFF and disconnect the battery negative
(-) cable.
|
| 2. |
Lift the vehicle.
|
| 3. |
Disconnect the vapor tube quick-connector (A,B) and the ventilation
hose (C).
|
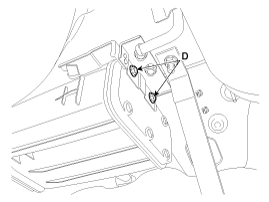
| 4. |
Remove the canister assembly after removing installation bolts
(D).
|
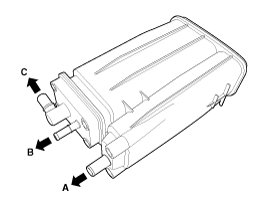
Inspection
| 1. |
Check for the following items visually.
- Cracks or leakage of the canister
- Loose connection, distortion, or damage of the vapor hose/tube
A: Canister ↔ Atmosphere (Fuel tank air filter)
B: Canister ↔ Intake manifold
C: Canister ↔ Fuel tank
|
Installation
Installation is the reverse of removal.
Canister bracket installation bolt:
19.6 ~ 29.4 N.m (2.0 ~ 3.0 kgf.m, 14.5 ~ 21.7 lb-ft)
Canister installation bolt:
3.9 ~ 5.9 N.m (0.4 ~ 0.6 kgf.m, 2.9 ~ 4.3 lb-ft)
|
 Repair procedures
Inspection
[System Inspection]
1.
Disconnect the vapor hose from the intake manifold and connect
a vacuum pump to the nipple on the intake manifold.
· At Co ...
 Fuel Filler Cap. Description and Operation
Description
A ratchet tightening device on the threaded fuel filler cap reduces the
chances of incorrect installation, which seals the fuel filler. After the gasket
on the fuel filler cap an ...
See also:
Passenger Airbag (PAB) Module. Components and Components Location
Components
...
Fuel Tank Pressure Sensor (FTPS). Repair procedures
Inspection
1.
Connect the GDS on the Data Link Connector (DLC).
2.
Measure the output voltage of the FTPS.
Specifica ...
Owner’s responsibility
✽ NOTICE
Maintenance Service and Record Retention are the owner's responsibility.
You should retain documents that show proper maintenance has been performed on
your vehicle in accordan ...
Categories
- Hyundai Veloster Manuals Home
- Hyundai Veloster 2010-2017 Owner's Manual
- Hyundai Veloster 2010-2017 Service Manual

© 2011-2026 Copyright www.hvmanual.com