 Hyundai Veloster: Rear Disc Brake. Repair procedures
Hyundai Veloster 2011-2017 Service Manual / Brake System / Brake System / Rear Disc Brake. Repair procedures
Hyundai Veloster: Rear Disc Brake. Repair procedures
Hyundai Veloster 2011-2017 Service Manual / Brake System / Brake System / Rear Disc Brake. Repair procedures
Hyundai Veloster 2011-2017 Service Manual / Brake System / Brake System / Rear Disc Brake. Repair procedures
Removal
| 1. |
Remove the rear wheel & tire.
|
| 2. |
Release the parking lever and parking brake cable is loose.
|
| 3. |
Remove the parking brake cable (B), after removing the clip (A).
|
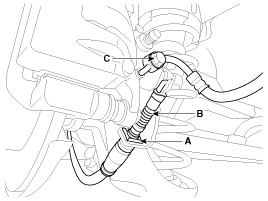
| 4. |
Remove the hose eyebolt (C).
|
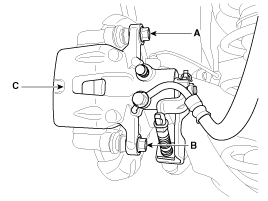
| 5. |
Loosen the caliper mounting bolts (B), then remove the rear caliper
assembly (A).
|

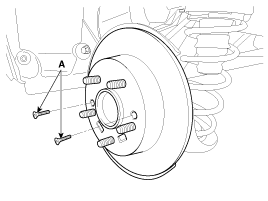
| 6. |
Remove the rear brake disc by loosening the screws (A).
|
Replacement
| Rear Brake Pads |
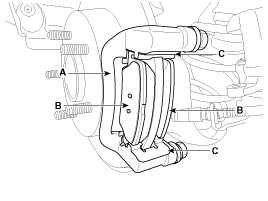
| 1. |
Loosen the guide rod bolts (A,B) and then remove the rear caliper
body (C).
|
| 2. |
Replace pad retainers (C) and brake pads (B) in the caliper carrier
(A).
|
Inspection
| Rear Brake Disc Thickness Check |
| 1. |
Check the brake pads for wear and fade.
|
| 2. |
Check the brake disc for damage and cracks.
|
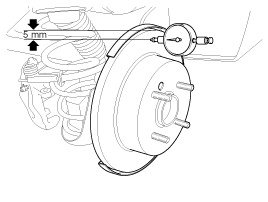
| 3. |
Remove all rust and contamination from the surface, and measure
the disc thickness at 8 points, at least, of same distance (5mm) from
the brake disc outer circle.
|
| 4. |
If wear exceeds the limit, replace the discs and pad assembly
left and right of the vehicle.
|
| Rear Brake Pad Check |
| 1. |
Check the pad wear. Measure the pad thickness and replace it,
if it is less than the specified value.
|
| 2. |
Check the damage of pad, backing metal and contamination with
grease.
|
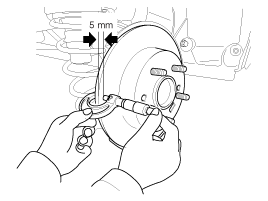
| Rear Brake Disc Runout Check |
| 1. |
Place a dial gauge about 5mm (0.2 in.) from the outer circumference
of the brake disc, and measure the runout of the disc.
|
| 2. |
If the runout of the brake disc exceeds the limit specification,
replace the disc, and then measure the runout again.
|
| 3. |
If the runout exceeds the limit specification, install the brake
disc after turning it 180° and then check the runout of the brake disc
again.
|
| 4. |
If the runout cannot be corrected by changing the position of
the brake disc, replace the brake disc.
|
Installation
| 1. |
Installation is the reverse of removal.
|
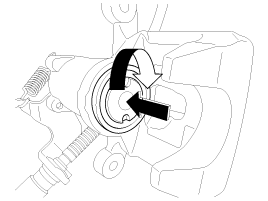
| 2. |
Rotate the caliper piston and push the direction of the arrow.
|
| 3. |
After installation, bleed the
(Refer to Brake system bleeding)
|
 Rear Disc Brake. Components and Components Location
Components
1. Guide rod bolt
2. Bleed screw
3. Caliper carrier
4. Caliper body
5. Brake pad
6. Pad retainer
...

See also:
Front Driveshaft. Repair procedures
Replacement
1.
Loosen the wheel nuts slightly.
Raise the vehicle, and make sure it is securely supported.
2.
Remove the front wheel and ...
Rear Coil Spring. Repair procedures
Replacement
1.
Remove the rear wheel & tire.
Tightening torque :
88.3 ~ 107.9N.m(9.0 ~ 11.0kgf.m, 65.1 ~ 79.6lb-ft)
...
Rear Coil Spring. Components and Components Location
Components
1. Spring upper pad
2. Spring
3. Spring lower pad
...
Categories
- Hyundai Veloster Manuals Home
- Hyundai Veloster 2010-2017 Owner's Manual
- Hyundai Veloster 2010-2017 Service Manual

© 2011-2026 Copyright www.hvmanual.com