Hyundai Veloster Manuals

Hyundai Veloster: Steering Gear box. Repair procedures - Electric Power Steering - Steering SystemHyundai Veloster: Steering Gear box. Repair procedures

Replacement

1.
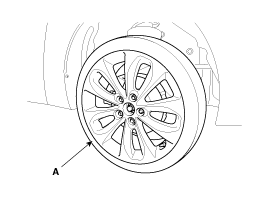
Remove the front wheel & tire.

Tightening torque :
88.3 ~ 107.9N.m(9.0 ~ 11.0kgf.m, 65.1 ~ 79.6lb-ft)

Be careful not to damage to the hub bolts when removing the front wheel & tire.
2.
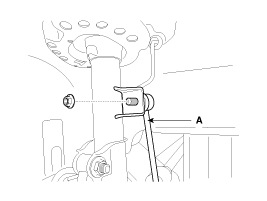
Disconnect the stabilizer link (A) with the front strut assembly after loosening the nut.

Tightening torque :
98.1 ~ 117.7N.m(10.0 ~ 12.0kgf.m, 72.3 ~ 86.8lb-ft)

3.
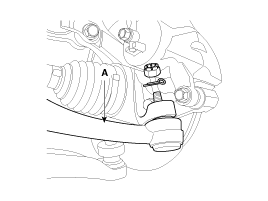
Loosen the nut and then remove the tie-rod end (A) with the front axle.

Tightening torque :
23.5 ~ 33.3N.m(2.4 ~ 3.4kgf.m, 19.4 ~ 24.6lb-ft)

4.
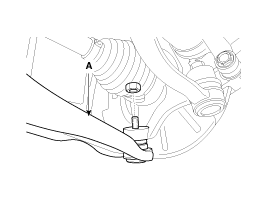
Loosen the nut and then remove the lower arm (A).

Tightening torque :
78.5 ~ 88.3N.m(8.0 ~ 9.0kgf.m, 57.9 ~ 65.1lb-ft)

5.
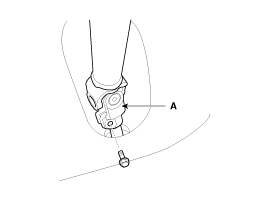
Loosen the bolt (A) and then disconnect the universal joint assembly from the pinion of the steering gear box.

Tightening torque :
32.4 ~ 37.3N.m(3.3 ~ 3.8kgf.m, 23.9 ~ 27.5lb-ft)

•
Lock the steering wheel in the straight ahead position to prevent the damage of the clock spring inner cable when you handle the steering wheel.
•
Must be replaced with new bolts when assembling. (SEAL-LOCK has been processed)
SEAL-LOCK Specifications: MS721-39 "TYPE-D" Product: ND industries 1193S
6.
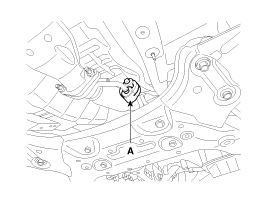
Remove the rubber hanger (A).

7.
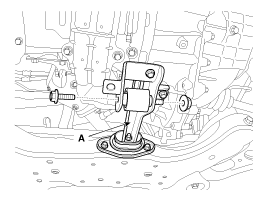
Loosen the roll rod (A) mounting bolts and nuts.

Tightening torque :
53.9 ~ 63.7N.m(5.0 ~ 6.5kgf.m, 39.8 ~ 47.0lb-ft)

8.
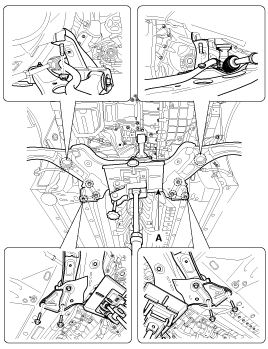
Loosen the bolts & nuts and then remove the front sub frame (A).

Tightening torque :
Sub frame mounting bolt & nut
156.9 ~ 176.5N.m(16.0 ~ 18.0kgf.m, 115.7 ~ 130.2lb-ft)
Sub frame stay mounting bolt
44.1 ~ 53.9N.m(4.5 ~ 5.5kgf.m, 32.5 ~ 39.8lb-ft)

9.
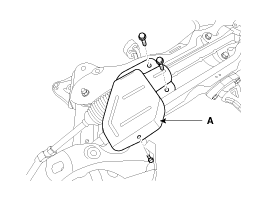
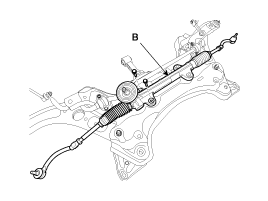
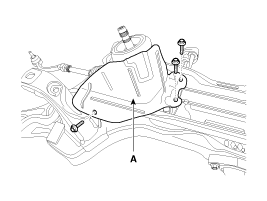
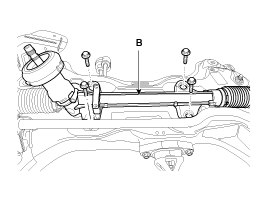
Remove the protector (A) and steering gearbox (B) from the front sub frame by loosening the mounting bolts.

Tightening torque :
58.8 ~ 78.8N.m (6.0 ~ 8.0kgf.m, 43.4 ~ 57.9lb-ft)

[LHD]

[LHD]

[RHD]

[RHD]

10.
Installation is the reverse of the removal.
11.
Check the wheel alignment.
(Refer to SS group - "Tires/Wheels")

Steering Gear box. Components and Components Location
Components 1. Tie-rod end 2. Lock nut 3. Bellows clip 4. Bellows 5. Tie rod 6. Rack bar 7. Dust packing 8. Dust cap 9. Oil seal 10. Pinion plug ...

Restraint (Advanced)
...

See also:

Daytime running light
Daytime Running Lights (DRL) can make it easier for others to see the front of your vehicle during the day. DRL can be helpful in many different driving conditions, and it is especially helpful af ...

Connecting your unit and bluetooth phone
To connect using the unit settings (1) 1.Press on the control panel. 2.Touch [Bluetooth]. 3.Touch [Search for Bluetooth devices]. If you want to cancel, touch [Cancel]. 4.Touch a bluetooth pho ...

Description and Operation
Operation and Leakage Check Check all of the following items: Component Procedure Brake Booster (A) Check brake operation by applyin ...

Categories


© 2011-2025 Copyright www.hvmanual.com