 Hyundai Veloster: Shift Lever. Repair procedures
Hyundai Veloster 2011-2017 Service Manual / Manual Transaxle System (M6CF1) / Manual Transaxle Control System / Shift Lever. Repair procedures
Hyundai Veloster: Shift Lever. Repair procedures
Hyundai Veloster 2011-2017 Service Manual / Manual Transaxle System (M6CF1) / Manual Transaxle Control System / Shift Lever. Repair procedures
Hyundai Veloster 2011-2017 Service Manual / Manual Transaxle System (M6CF1) / Manual Transaxle Control System / Shift Lever. Repair procedures
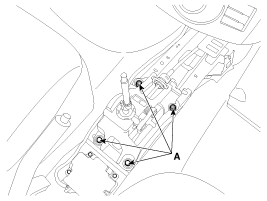
Removal
| Shift Lever Assembly Replacement |
| 1. |
Remove the floor Interior console assembly.
(Refer to "Interior(Console)" in BD group)
|
| 2. |
Remove the cover (A).
|
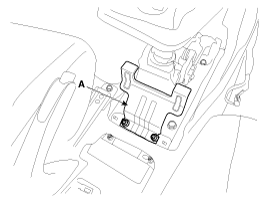
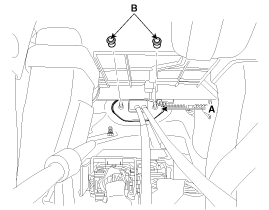
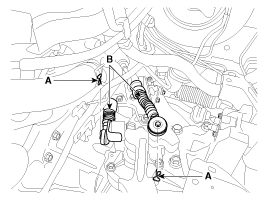
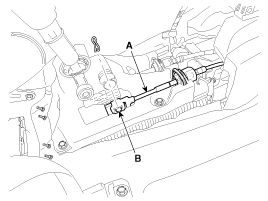
| 3. |
Remove the select cable (B) by removing the snap
pin (A).
|
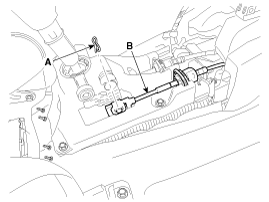
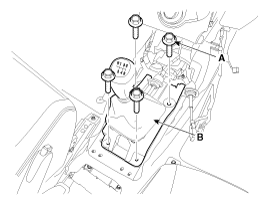
| 4. |
Remove the shift lever assembly (B) by removing the
bolts (A-4ea).
|
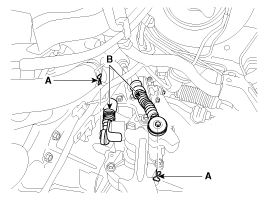
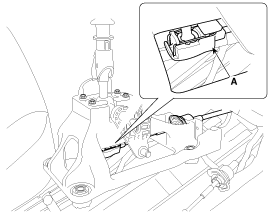
| 5. |
Remove the shift cable (B) by removing the clip (A).
|
| 6. |
Installation is the reverse of removal.
|
| Select / Shift Cable Replacement |
| 1. |
Remove the floor Interior console assembly.
(Refer to "Interior(Console)" in BD group)
|
| 2. |
Remove the cover (A).
|
| 3. |
Remove the select cable (B) by removing the snap
pin (A).
|
| 4. |
Remove the shift lever assembly (B) by removing the
bolts (A-4ea).
|
| 5. |
Remove the shift cable (B) by removing the clip (A).
|
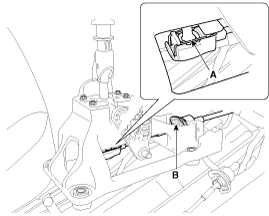
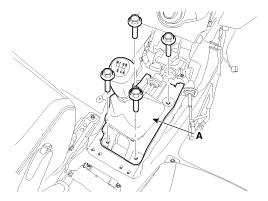
| 6. |
Remove the retainer (A) and nuts (B-2ea).
|
| 7. |
Disconnect the select and shift cable assembly (B)
after removing the pin (A).
|
| 8. |
Remove the shift cable and select cable at cabin
room.
|
| 9. |
Installation is the reverse of removal.
|
[Shift / Select Cable Installation Tips]
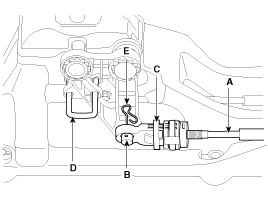
| 1. |
Install the select and shift cable assembly (B) after
removing the pin (A).
|
| 2. |
Install is the shift cable (A).
|
| 3. |
Install is the shift lever assembly (A).
|
| 4. |
Shift to the 3th gear position.
|
| 5. |
Insert the selected cable (A) to the shift lever
assembly pin (B).
|
| 6. |
You have to push in the adjuster (C).
|
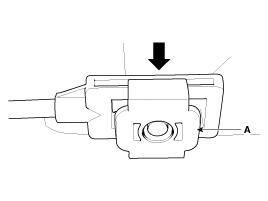
| 7. |
Remove the neutral position pin (D).
|
| 8. |
Install the snap pin (E).
|
Inspection
| 1. |
Check the select cable for proper operation and for
damage.
|
| 2. |
Check the shift cable for proper operation and for
damage.
|
| 3. |
Check the boots for damage.
|
| 4. |
Check the boots for wear abrasion sticking, restricted
movement or damage.
|
| 5. |
Check for the weak or damaged spring.
|
Adjustment
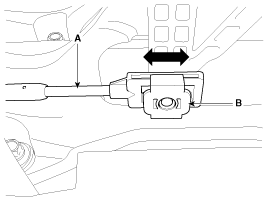
| 1. |
In neutral position, disjoin select cable (A) from
shift lever assembly pin (B).
|
| 2. |
Disconnect select adjuster (A) to an arrow.
|
| 3. |
Shift to the 3th gear position.
|
| 4. |
Adjustment adjuster (B) on select cable (A) as rolling
from side to side.
|
| 5. |
Insert on free load and press the adjuster.
|
| 6. |
After shifting 2nd gear, cheking the left select
gap about 1mm(if not, loop no, 1~5)
|
| 7. |
In neutral position, join by clip (A).
|

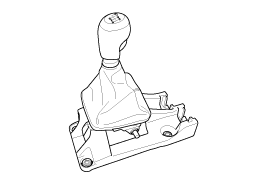
 Shift Lever. Components and Components Location
Components
1. Shift lever knob & boot assembly
2. Shift lever assembly
3. Shift cable assembly
4. Select cable assembly
5. Retainer
...
 Back-up Lamp Switch. Description and Operation
Description
Back up lamp switch is pushed by the reverse lug sliding
when select arm, and switches the back up lamp.
...
See also:
Rail Pressure Sensor (RPS). Schematic Diagrams
Circuit Diagram
...
Playing an audio CD and MP3/ WMA/USB/iPod files
Disc
Insert a disc in the disc slot and playback will start automatically.
MP3/WMA CD
USB
You can play the files recorded in a USB memory device.
Connect a USB device to the USB port and playba ...
Rear Door. Components and Components
Location
Components
1. Rear door trim
2. Rear door delta inner cover
3. Rear door inside handle cap
4. Rear door trim seal
5. Rear door panel assembly
6. Rear door be ...
Categories
- Hyundai Veloster Manuals Home
- Hyundai Veloster 2010-2017 Owner's Manual
- Hyundai Veloster 2010-2017 Service Manual

© 2011-2026 Copyright www.hvmanual.com