 Hyundai Veloster: Seat Belt Pretensioner (BPT). Repair procedures
Hyundai Veloster 2011-2017 Service Manual / Restraint (Advanced) / Seat Belt Pretensioner / Seat Belt Pretensioner (BPT). Repair procedures
Removal
| 1. |
Disconnect the battery negative cable, and wait for at least three
minutes before beginning work.
|
| 2. |
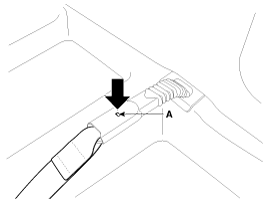
Remove the seat belt after pushing the lock pin (A).
|
| 3. |
Remove the following parts.
(Refer to the Body group - "Interior trim")
|
| 4. |
Remove the upper anchor bolt.
|
| 5. |
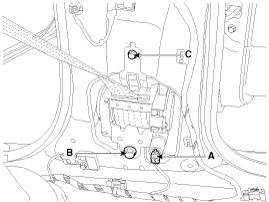
Disconnect the seat belt pretensioner connector (A).
|
| 6. |
Loosen the seat belt pretensioner mounting bolts (B,C) and remove
the seat belt pretensioner.
|
Installation
| 1. |
Remove the ignition key from the vehicle.
|
| 2. |
Disconnect the battery negative cable and wait for at least three
minutes.
|
| 3. |
Install the seat belt pretensioner with a bolts (B, C).
|
| 4. |
Connect the seat belt pretensioner (BPT) connector (A).
|
| 5. |
Install the upper anchor bolts.
|
| 6. |
Install the following parts.
(Refer to the Body group - "Interior trim")
|
| 7. |
Insert seat belt to the anchor pretensioner.
|
| 8. |
Reconnect the battery negative cable.
|
| 9. |
After installing the seat belt pretensioner, confirm proper system
operation:
|
 Anchor Pretensioner (APT). Description and Operation
Description
Front anchor pretensioner operates as well as Belt Pretensioner at the
same time If it gets into its deploy condition after a collision. It is located
at near anchor on driver se ...
See also:
Components and Components Location
Components Location
1. Engine Control Module (ECM)
2. Manifold Absolute Pressure Sensor (MAPS)
3. Intake Air Temperature Sensor (IATS)
4. Engine Coolant Temperature Sensor ...
Side impact air bag
Your vehicle is equipped with a side impact air bag in each front seat. The purpose
of the air bag is to provide the vehicle's driver and/or the front passenger with
additional protection th ...
Manifold Absolute Pressure Sensor (MAPS). Description and Operation
Description
Manifold Absolute Pressure Sensor (MAPS) is a speed-density type sensor
and is installed on the surge tank. It senses absolute pressure of the surge
tank and transfers the analog ...
Categories
- Hyundai Veloster Manuals Home
- Hyundai Veloster 2010-2017 Owner's Manual
- Hyundai Veloster 2010-2017 Service Manual


