
 Hyundai Veloster: Camshaft Position Sensor (CMPS). Repair procedures
Hyundai Veloster 2011-2017 Service Manual / Fuel System / Engine Control System / Camshaft Position Sensor (CMPS). Repair procedures
Hyundai Veloster: Camshaft Position Sensor (CMPS). Repair procedures
Hyundai Veloster 2011-2017 Service Manual / Fuel System / Engine Control System / Camshaft Position Sensor (CMPS). Repair procedures
Hyundai Veloster 2011-2017 Service Manual / Fuel System / Engine Control System / Camshaft Position Sensor (CMPS). Repair procedures
Inspection
| 1. |
Check the signal waveform of the CMPS and CKPS using the GDS.
|
Removal
|

| [Bank 1 / Intake] |
| 1. |
Turn the ignition switch OFF and disconnect the battery negative
(-) cable.
|
| 2. |
Disconnect the camshaft position sensor connector (A).
|
| 3. |
Remove the installation bolt (B), and then remove the sensor.
|
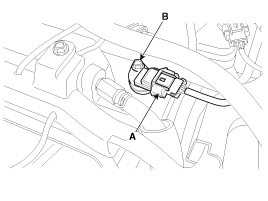
| [Bank 1 / Exhaust] |
| 1. |
Turn the ignition switch OFF and disconnect the battery negative
(-) cable.
|
| 2. |
Disconnect the camshaft position sensor connector (A).
|
| 3. |
Remove the hanger and the protector.
|
| 4. |
Remove the installation bolt (B), and then remove the sensor.
|
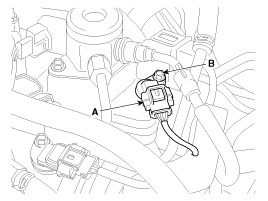
Installation
|

|
|
|
| 1. |
Installation is reverse of removal.
|
 Camshaft Position Sensor (CMPS). Schematic Diagrams
Circuit Diagram
...
 Knock Sensor (KS). Description and Operation
Description
Knocking is a phenomenon characterized by undesirable vibration and noise
and can cause engine damage. Knock Sensor (KS) is installed on the cylinder
block and senses engine knoc ...
See also:
Rear Wheel Speed Sensor. Repair procedures
Removal
1.
Remove the rear wheel and tire.
Tightening torque:
88.3 ~ 107.9 N.m (9.0 ~ 11.0 kgf.m, 65.1 ~ 79.6 lb-ft)
...
Special Service Tools
Special Service Tools
Tool(Number and Name)
Illustration
Use
09495-3K000
Band installer
Installation of ear type bo ...
Tire replacement
If the tire is worn evenly, a tread wear indicator will appear as a solid band
across the tread. This shows there is less than 1/16 inch (1.6 mm) of tread left
on the tire. Replace the tire when ...
Categories
- Hyundai Veloster Manuals Home
- Hyundai Veloster 2010-2017 Owner's Manual
- Hyundai Veloster 2010-2017 Service Manual

© 2011-2026 Copyright www.hvmanual.com