 Hyundai Veloster: SRS components and functions
Hyundai Veloster 2011-2017 Owner's Manual / Safety features of your vehicle / Air bag - advanced supplemental restraint system / SRS components and functions
Hyundai Veloster: SRS components and functions
Hyundai Veloster 2011-2017 Owner's Manual / Safety features of your vehicle / Air bag - advanced supplemental restraint system / SRS components and functions
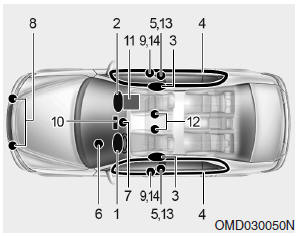
The SRS consists of the following components:
1. Driver's front air bag module
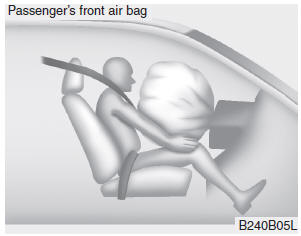
2. Passenger's front air bag module
3. Side
impact air bag modules
4. Curtain air bag modules
5. Retractor pre-tensioner
assemblies
6. Air bag warning light
7. SRS control module (SRSCM)
8. Front
impact sensors
9. Side impact sensors
10. PASS AIR BAG “OFF” indicator (Front
passenger’s seat only)
11. Occupant classification system (Front passenger’s seat
only)
12. Driver’s and front passenger’s seat belt buckle sensors
13. Anchor
pre-tensioner
14. Side pressure sensor

The SRS air bag warning light " "
on the instrument panel will illuminate for about 6 seconds after the ignition switch
is turned to the ON position, after which the SRS air bag warning light "
"
on the instrument panel will illuminate for about 6 seconds after the ignition switch
is turned to the ON position, after which the SRS air bag warning light " "
should go out.
"
should go out.
WARNING
If any of the following conditions occurs, this indicates a malfunction of the SRS. Have an authorized HYUNDAI dealer inspect the air bag system as soon as possible.
- • The light does not turn on briefly when you turn the ignition ON.
- • The light stays on after illuminating for approximately 6 seconds.
- • The light comes on while the vehicle is in motion.
- • The light blinks when the ignition switch is in ON position.
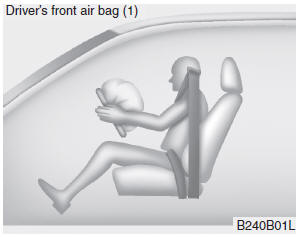
The front air bag modules are located both in the center of the steering wheel and in the front passenger's panel above the glove box. When the SRSCM detects a sufficiently severe impact to the front of the vehicle, it will automatically deploy the front air bags.
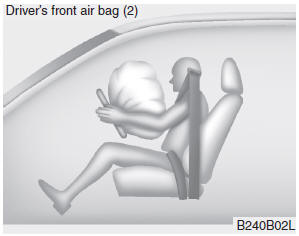
Upon deployment, tear seams molded directly into the pad covers will separate under pressure from the expansion of the air bags. Further opening of the covers then allows full inflation of the air bags.
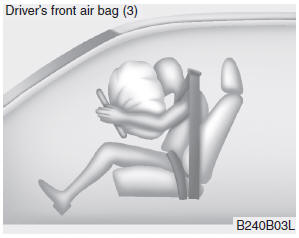
A fully inflated air bag, in combination with a properly worn seat belt, slows the driver's or the passenger's forward motion, reducing the risk of head and chest injury.
After complete inflation, the air bag immediately starts deflating, enabling the driver to maintain forward visibility and the ability to steer or operate other controls.
WARNING
- • Do not install or place any accessories (drink holder, CD or discs holder, sticker, etc.) on the front passenger's panel above the glove box in a vehicle with a passenger's air bag. Such objects may become dangerous projectiles and cause injury if the passenger's air bag inflates.
- • When installing a container of liquid air freshener inside the vehicle, do not place it near the instrument cluster nor on the instrument panel surface. It may become a dangerous projectile and cause injury if the passenger's air bag inflates.
WARNING
- • If an air bag deploys, there may be a loud noise followed by a fine dust released in the vehicle. These conditions are normal and are not hazardous - the air bags are packed in this fine powder. The dust generated during air bag deployment may cause skin or eye irritation as well as aggravate asthma for some persons. Always wash all exposed skin areas thoroughly with lukewarm water and a mild soap after an accident in which the air bags were deployed.
- • The SRS can function only when the ignition switch is in the ON position.
If the SRS air bag warning light ""
does not illuminate, or continuously remains on after illuminating for about
6 seconds when the ignition switch is turned to the ON position, or after the
engine is started, comes on while driving, the SRS is not working properly.
If this occurs, have your vehicle immediately inspected by an authorized HYUNDAI
dealer.
- • Before you replace a fuse or disconnect a battery terminal, turn the ignition switch to the LOCK position and remove the ignition key for ignition key, and turn the engine start/stop button to the OFF position for smart key. Never remove or replace the air bag related fuse(s) when the ignition switch is in the ON position. Failure to heed this warning will cause the SRS air bag warning light to illuminate.
 Air bag warning light
The purpose of air bag warning light in your instrument panel is to alert you
of a potential problem with your air bag - Supplemental Restraint System (SRS).
When the ignition switch is turned ON ...
 Occupant classification system
Your vehicle is equipped with an occupant classification system in the front
passenger's seat.
The occupant classification system is designed to detect the presence of a properly-seated
fro ...
See also:
Brake Booster. Components and Components Location
Components (1)
1. Brake booster
2. Master cylinder assembly
3. O-ring
Components (2)
1. Vacuum pump
2. Bracket
...
Seat Belt Buckle Switch (BS). Repair procedures
Removal
1.
Disconnect the battery negative cable, and wait for at least three
minutes before beginning work.
2.
Remove the front seat asse ...
Troubleshooting
Troubleshooting
Symptom
Possible cause
Remedy
Hard steering
Improper front wheel alignment
Excessive turning resistance of lower ar ...
Categories
- Hyundai Veloster Manuals Home
- Hyundai Veloster 2010-2017 Owner's Manual
- Hyundai Veloster 2010-2017 Service Manual
