 Hyundai Veloster: Side Impact Sensor (SIS). Repair procedures
Hyundai Veloster 2011-2017 Service Manual / Restraint (Depowered) / SRSCM / Side Impact Sensor (SIS). Repair procedures
Hyundai Veloster 2011-2017 Service Manual / Restraint (Depowered) / SRSCM / Side Impact Sensor (SIS). Repair procedures
Removal
Side Impact Sensor
| 1. |
Disconnect the battery negative cable and wait for at least three
minutes before beginning work.
|
| 2. |
Remove the door scuff trim.
(Refer to the Body group - "Interior trim")
|
| 3. |
Remove the center pillar lower trim.
(Refer to the Body group - "Interior trim")
|
| 4. |
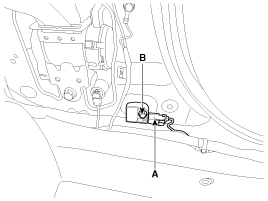
Disconnect the side impact sensor connector (A).
|
| 5. |
Loosen the side impact sensor mounting bolt (B) and remove the
side impact sensor.
|
Installation
Side Impact Sensor
|
| 1. |
Install the new side impact sensor with the bolt then connect
the side impact sensor connector.
|
| 2. |
Install the center pillar lower trim.
(Refer to the Body group - "Interior trim")
|
| 3. |
Install the door scuff trim.
(Refer to the Body group - "Interior trim")
|
| 4. |
Reconnect the battery negative cable.
|
| 5. |
After installing the Side Impact Sensor, confirm proper system
operation:
|
 Side Impact Sensor (SIS). Components and Components Location
Components
...
 Schematic Diagrams
Circuit Diagram (1)
Circuit Diagram (2)
SRSCM Connector terminal
Pin
Function (Connector A)
Pin
Function (Connector B)
...
See also:
Special Service Tools
Special Service Tools
Tool (Number and Name)
Illustration
Use
Deployment tool
0957A-34100A
Airbag deployment tool.
...
High mounted stop light replacement
If the light does not operate, have the vehicle checked by an authorized HYUNDAI
dealer.
3. Loosen the assembly retaining nuts. 4. Remove the rear combination light
assembly from the body of th ...
CVVT Oil Control Valve (OCV). Schematic Diagrams
Circuit Diagram
...
Categories
- Hyundai Veloster Manuals Home
- Hyundai Veloster 2010-2017 Owner's Manual
- Hyundai Veloster 2010-2017 Service Manual
© 2011-2026 Copyright www.hvmanual.com

