 Hyundai Veloster: Power Window Switch. Repair procedures
Hyundai Veloster 2011-2017 Service Manual / Body Electrical System / Power Windows / Power Window Switch. Repair procedures
Hyundai Veloster: Power Window Switch. Repair procedures
Hyundai Veloster 2011-2017 Service Manual / Body Electrical System / Power Windows / Power Window Switch. Repair procedures
Hyundai Veloster 2011-2017 Service Manual / Body Electrical System / Power Windows / Power Window Switch. Repair procedures
Inspection
Power Window Main Switch Inspection
| 1. |
Disconnect the negative (-) battery terminal.
|
| 2. |
Remove the front door trim panel.
(Refer to the BD group - "Front door")
|
| 3. |
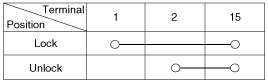
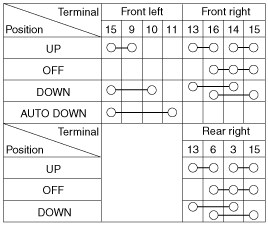
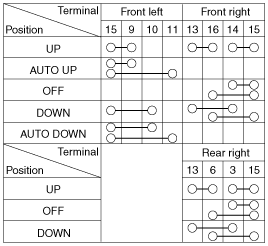
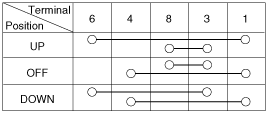
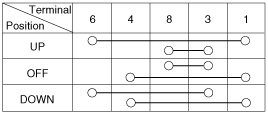
Check for continuity between the terminals in each switch position
according to the table. If the continuity condition is not normal, replace
the switch.
[Auto Down]
[Safety Up/Down]
|
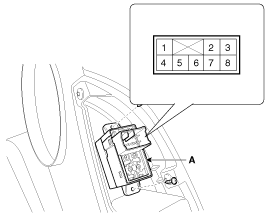
| 4. |
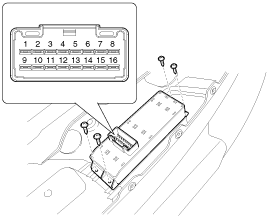
Remove the grip holder cover after loosening 4 bolts.
|
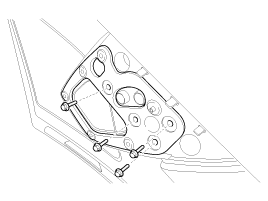
| 5. |
Remove the grip holder bracket (A).
|
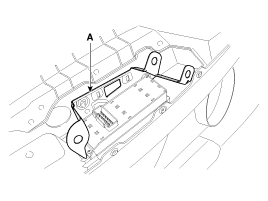
| 6. |
Remove the power window switch module (A) after loosening 4 screws.
|

Passenger Power Window Switch Inspection
| 1. |
Disconnect the negative (-) battery terminal.
|
| 2. |
Remove the front door trim panel.
(Refer to the BD group - "Front door")
|
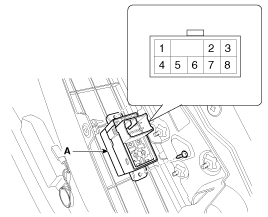
| 3. |
Disconnect the connector from the switch.
|
| 4. |
Check for continuity between the terminals in each switch position
according to the table. If the continuity condition is not normal, replace
the switch.
|
| 5. |
Remove the power window switch after loosening 2 screws.
|
Rear Power Window Switch Inspection
| 1. |
Disconnect the negative (-) battery terminal.
|
| 2. |
Remove the rear door trim panel.
(Refer to the BD group - "Rear door")
|
| 3. |
Disconnect the connector from the switch.
|
| 4. |
Check for continuity between the terminals in each switch position
according to the table. If the continuity condition is not normal, replace
the switch.
|
| 5. |
Remove the power window switch after loosening 2 screws.
|
 Power Window Switch. Schematic Diagrams
Circuit Diagram
Driver Power Window Switch
Passenger power window switch
Rear power window switch
...

See also:
Emergency tailgate safety release
Your vehicle is equipped with the emergency tailgate safety release located on
the bottom of the tailgate. When someone is inadvertently locked in the luggage
compartment, the tailgate can be op ...
General Information
General
The supplemental restraint system (SRS) is designed to supplement the
seat belt to help reduce the risk or severity of injury to the driver and passenger
by activating and deploying ...
Exterior care
Exterior general caution
It is very important to follow the label directions when using any chemical cleaner
or polish. Read all warning and caution statements that appear on the label.
Finish mai ...
Categories
- Hyundai Veloster Manuals Home
- Hyundai Veloster 2010-2017 Owner's Manual
- Hyundai Veloster 2010-2017 Service Manual

© 2011-2026 Copyright www.hvmanual.com