 Hyundai Veloster: Smart key unit. Repair procedures
Hyundai Veloster 2011-2017 Service Manual / Body Electrical System / Smart key System / Smart key unit. Repair procedures
Hyundai Veloster: Smart key unit. Repair procedures
Hyundai Veloster 2011-2017 Service Manual / Body Electrical System / Smart key System / Smart key unit. Repair procedures
Inspection
| - |
Refer to the BE group - inspection / self diagnosis with GDS.
|
| - |
Refer to the BE group - inspection / self diagnosis with GDS.
|
| - |
Refer to the BE group - inspection / self diagnosis with GDS.
|
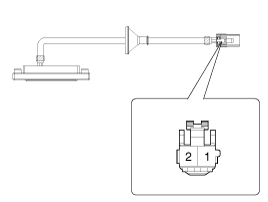
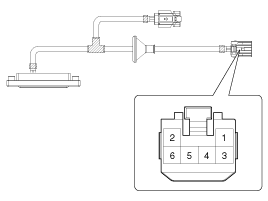
| 1. |
Check for continuity between the Trunk lid open switch terminals.
[with Back View Camera]
1. Ground
2. Tailgate switch
[without Back View Camera]
1. Ground (Tailgate)
2. Tailgate switch
3. Ground (Back View Camera)
4. Power
5. V-OUT
6. V-GND
|
| 2. |
If continuity is not specified, inspect the switch
|

Removal
| 1. |
Disconnect the negative(-) battery terminal.
|
| 2. |
Remove the AVN head unit.
(Refer to the BE group - "AVN system - AVN Head Unit")
|
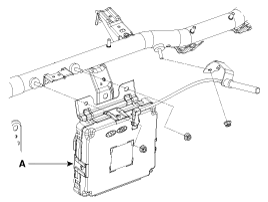
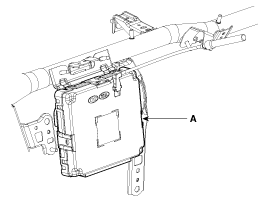
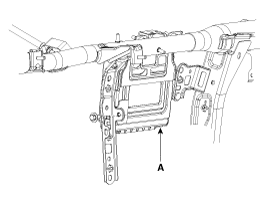
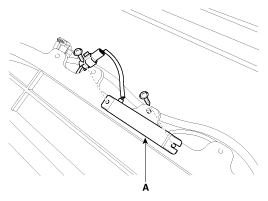
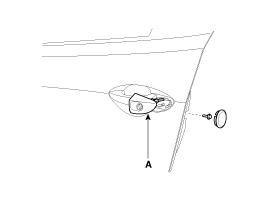
| 3. |
Remove the smart key unit(A) with loosening bolt and nut, then
disconnect the connector.
[USA]
[CANADA]
|

Take care not to scratch the crash pad and related parts.
|
| 1. |
Disconnect the negative(-) battery terminal.
|
| 2. |
Remove the console.
(Refer to the BD group - "Console")
|
| 3. |
Remove the multimedia jack.
|
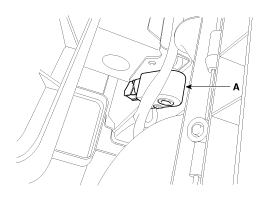
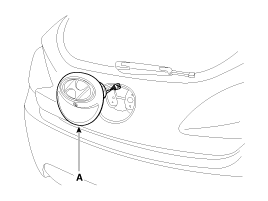
| 4. |
Disconnect the connector, then remove the interior #1 antenna(A)
after loosening 2 screws.
|
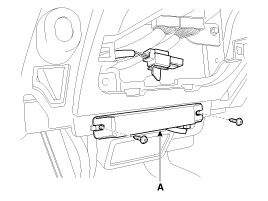
Take care not to scratch the crash pad and related parts.
|
| 1. |
Disconnect the negative(-) battery terminal.
|
| 2. |
Remove the console.
(Refer to the BD group - "Console")
|
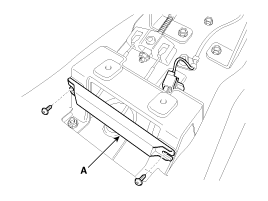
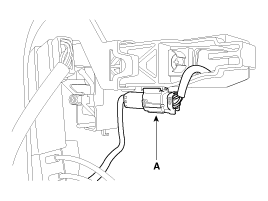
| 3. |
Disconnect the connector, then remove the interior #2 antenna(A)
after loosening 2 screws.
|
| 1. |
Disconnect the negative(-) battery terminal.
|
| 2. |
Remove the trunk transverse trim.
(Refer to the BD group - "Interior trim")
|
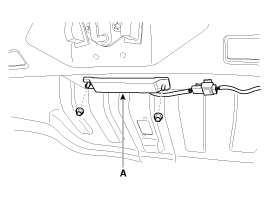
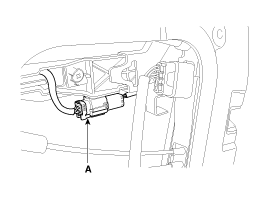
| 3. |
Disconnect the connector, then remove the trunk antenna(A) after
loosening 2 nuts.
|
| 1. |
Disconnect the negative(-) battery terminal.
|
| 2. |
Remove the rear bumper.
(Refer to the BD group - "Rear bumper")
|
| 3. |
Disconnect the connector, then remove the rear bumper antenna(A)
after loosening 2 screws.
|
| 1. |
Disconnect the negative(-) battery terminal.
|
| 2. |
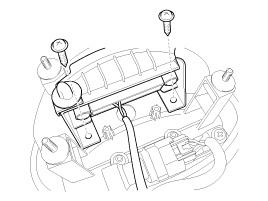
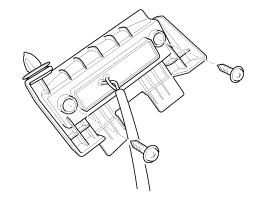
Remove the air duct.
|
| 3. |
Remove the buzzer(A) after disconnecting the connector.
|
| 1. |
Disconnect the negative(-) battery terminal.
|
| 2. |
Remove the front door trim.
(Refer to the BD group - "Front door")
|
| 3. |
Remove the door outside handle connector.
[Driver]
[Assistant]
|
| 4. |
Remove the outside handle cover(A) after loosening the mounting
bolt.
|
| 1. |
Disconnect the negative(-) battery terminal.
|
| 2. |
Remove the tailgate outside handle(A) after loosening the mounting
nut(3EA).
|
| 3. |
Remove the tailgate switch assembly after loosening the screw(2EA).
|
| 4. |
Remove the tailgate switch after loosening the screw(2EA).
|
Installation
| 1. |
Install the smart key unit.
|
| 2. |
Connect the connector and install the smart key unit.
|
| 3. |
Install the AVN head unit.
|
| 4. |
Install the negative (-) battery terminal and check the smart
key system.
|
| 1. |
Install the interior #1 antenna.
|
| 2. |
Install the multimedia jack and the console.
|
| 3. |
Install the negative (-) battery terminal and check the smart
key system.
|
| 1. |
Install the interior #2 antenna.
|
| 2. |
Install the console.
|
| 3. |
Install the negative (-) battery terminal and check the smart
key system.
|
| 1. |
Install the trunk antenna.
|
| 2. |
Install the trunk transverse trim.
|
| 3. |
Install the negative (-) battery terminal and check the smart
key system.
|
| 1. |
Install the exterior bumper antenna.
|
| 2. |
Install the rear bumper.
|
| 3. |
Install the negative (-) battery terminal and check the smart
key system.
|
| 1. |
Install the buzzer.
|
| 2. |
Install the air duct.
|
| 3. |
Install the negative (-) battery terminal and check the smart
key system.
|
| 1. |
Install the door outside handle.
|
| 2. |
Install the door trim.
|
| 3. |
Install the negative (-) battery terminal and check the smart
key system.
|
| 1. |
Install the tailgate switch.
|
| 2. |
Install the tailgate outside handle.
|
| 3. |
Install the negative (-) battery terminal and check the smart
key system.
|
 Smart key unit. Schematic Diagrams
Circuit Diagram
...

See also:
Seats
Driver’s seat
(1) Seat adjustment, forward/backward (2) Seatback recliner (3) Seat adjustment,
height (4) Lumbar support* (5) Driver seat folding lever (6) Seat warmer*
(7) Headrest adjustmen ...
Automatic climate control system
1. A/C (Air conditioning) button 2. Air intake control button 3. Rear window
defroster button 4. Mode selection button 5. Temperature control knob 6. Fan
speed control button 7. Auto button 8. O ...
Necessary inspections
Fluid levels, such as engine oil, engine coolant, brake fluid, and washer fluid
should be checked on a regular basis, with the exact interval depending on the fluid.
Further details are provided i ...
Categories
- Hyundai Veloster Manuals Home
- Hyundai Veloster 2010-2017 Owner's Manual
- Hyundai Veloster 2010-2017 Service Manual
