 Hyundai Veloster: Schematic Diagrams
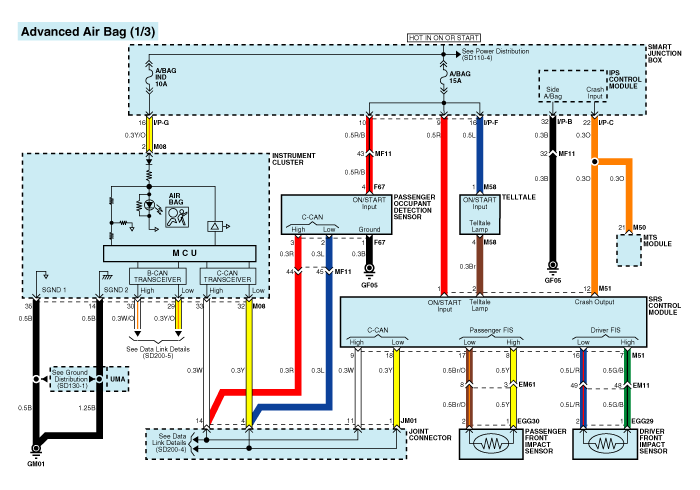
Circuit Diagram (1)
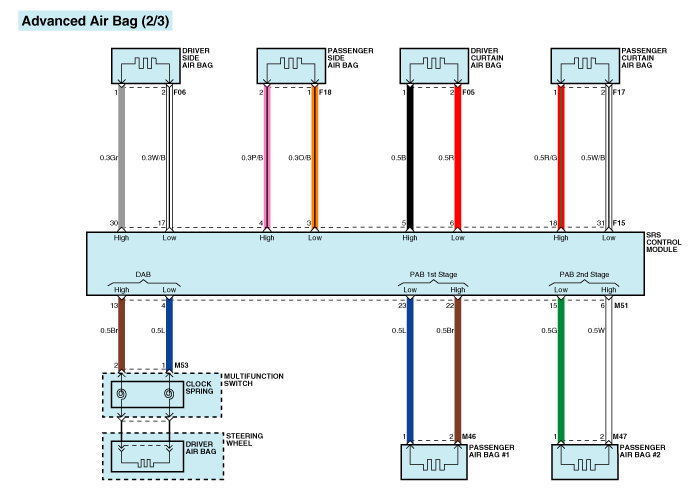
Circuit Diagram (2)
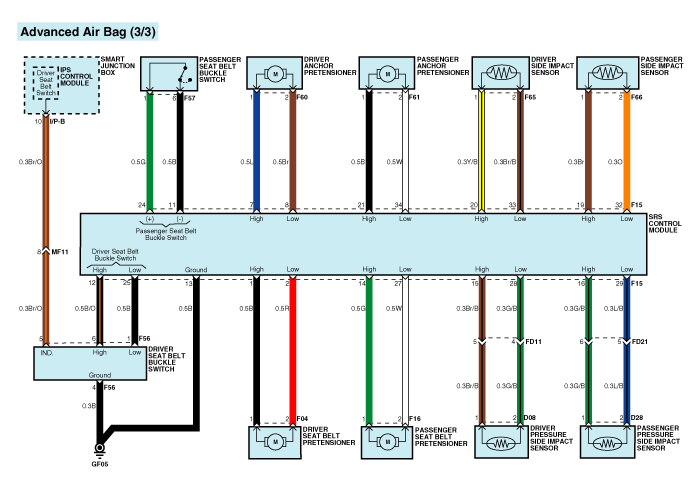
Circuit Diagram (3)
SRSCM Connector terminal
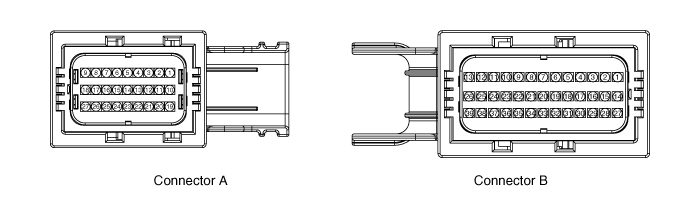
|
Pin |
Function (Connector A) |
Pin |
Function (Connector B) |
|
1 |
Ignition |
1 |
Seat belt pretensioner [Driver] High |
|
2 |
Telltale lamp |
2 |
Seat belt pretensioner [Driver] Low |
|
3 |
- |
3 |
Side airbag [Passenger] Low |
|
4 |
(1st stage) Driver airbag Low |
4 |
Side airbag [Passenger] High |
|
5 |
- |
5 |
Curtain airbag [Driver] High |
|
6 |
(2nd stage) Passenger airbag High |
6 |
Curtain airbag [Driver] Low |
|
7 |
Front impact sensor [Driver] High |
7 |
Anchor pretensioner [Driver] High |
|
8 |
Front impact sensor [Passenger] High |
8 |
Anchor pretensioner [Driver] Low |
|
9 |
CAN_High |
9 |
- |
|
10 |
- |
10 |
- |
|
11 |
- |
11 |
Seat belt buckle switch [Passenger] High |
|
12 |
Crash Output |
12 |
Seat belt buckle switch [Driver] High |
|
13 |
(1st stage) Driver airbag High |
13 |
Ground |
|
14 |
- |
14 |
Seat belt pretensioner [Passenger] High |
|
15 |
(2nd stage) Passenger airbag Low |
15 |
Pressure side impact sensor [Driver] High |
|
16 |
Front impact sensor [Driver] Low |
16 |
Pressure side impact sensor [Passenger] High |
|
17 |
Front impact sensor [Passenger] Low |
17 |
Side airbag [Driver] Low |
|
18 |
CAN_Low |
18 |
Curtain airbag [Passenger] High |
|
19 |
- |
19 |
Side impact sensor [Passenger] High |
|
20 |
- |
20 |
Side impact sensor [Driver] High |
|
21 |
- |
21 |
Anchor pretensioner [Passenger] High |
|
22 |
(1st stage) Passenger airbag High |
22 |
- |
|
23 |
(1st stage) Passenger airbag Low |
23 |
- |
|
24 |
- |
24 |
Seat belt buckle switch [Passenger] Low |
|
25 |
- |
25 |
Seat belt buckle switch [Driver] Low |
|
26 |
- |
26 |
- |
|
27 |
- |
27 |
Seat belt pretensioner [Passenger] Low |
|
|
|
28 |
Pressure side impact sensor [Driver] Low |
|
|
|
29 |
Pressure side impact sensor [Passenger] Low |
|
|
|
30 |
Side airbag [Driver] High |
|
|
|
31 |
Curtain airbag [Passenger] Low |
|
|
|
32 |
Side impact sensor [Passenger] Low |
|
|
|
33 |
Side impact sensor [Driver] Low |
|
|
|
34 |
Anchor pretensioner [Passenger] Low |
|
|
|
35 |
- |
|
|
|
36 |
- |
|
|
|
37 |
- |
|
|
|
38 |
- |
|
|
|
39 |
- |
 Passive Occupant Detection System (PODS-F). Repair procedures
Removal
PODS-F ECU
1.
Disconnect the battery negative cable, and wait for at least three
minutes before beginning work.
2.
Remove the ...
 Airbag Module
...
See also:
DCT Control Modle (TCM) > Description and Operation
Description
The Transmission Control Module (TCM) is like the brain for the DCT. It
receives information from various sensors for a wide range of transmission controls
to provide an optimal ...
Front seat adjustment
Forward and backward
Type A
To move the seat forward or backward:
1. Pull the seat slide adjustment lever up and hold it. 2. Slide the seat to
the position you desire. 3. Release the lever and ...
Passive Occupant Detection System (PODS-F). Repair procedures
Removal
PODS-F ECU
1.
Disconnect the battery negative cable, and wait for at least three
minutes before beginning work.
2.
Remove the ...
Categories
- Hyundai Veloster Manuals Home
- Hyundai Veloster 2010-2017 Owner's Manual
- Hyundai Veloster 2010-2017 Service Manual
