Replacement
Sunvisor Replacement
| •
|
Use a plastic panel removal tool to remove
interior trim pieces to without marring the surface.
|
| •
|
Put on gloves to protect your hands.
|
|
|
1. |
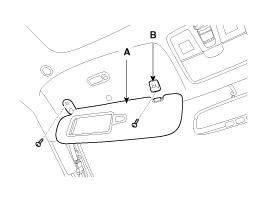
After loosening the mounting screws, then remove
the sunvisor (A) and retainer (B).
|
|
2. |
Installation is the reverse of removal.
|
Assist Handle Replacement
| •
|
Use a plastic panel removal tool to remove
interior trim pieces to without marring the surface.
|
| •
|
Put on gloves to protect your hands.
|
|
|
1. |
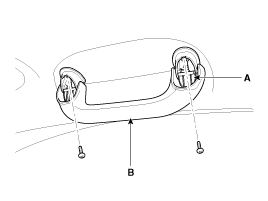
Remove the covers (A).
|
|
2. |
After loosening the mounting screws, then remove
the assist handle (B).
|
|
3. |
Installation is the reverse of removal.
|
Garment Hook Assembly Replacement
| •
|
Use a plastic panel removal tool to remove
interior trim pieces to without marring the surface.
|
| •
|
Put on gloves to protect your hands.
|
|
|
2. |
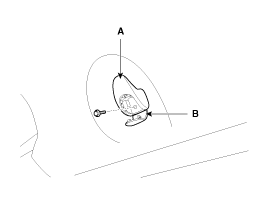
After loosening the mounting bolt, then remove the
garment hook assembly (A).
|
|
3. |
Installation is the reverse of removal.
|
Overhead Console Replacement
| •
|
Use a plastic panel removal tool to remove
interior trim pieces to without marring the surface.
|
| •
|
Put on gloves to protect your hands.
|
|
|
1. |
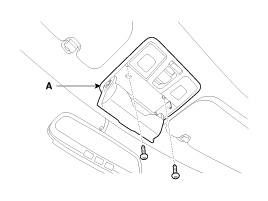
After loosening the mounting screws, then remove
the overhead console assembly (A).
|
|
2. |
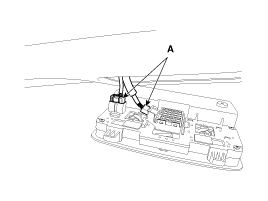
Disconnect the connectors (A).
|
|
3. |
Installation is the reverse of removal.
|
• |
Make sure the connector is connected
properly.
|
|
|
Vanity Lamp Replacement
| •
|
Use a plastic panel removal tool to remove
interior trim pieces to protect from marring the surface.
|
| •
|
Put on gloves to protect your hands.
|
|
|
1. |
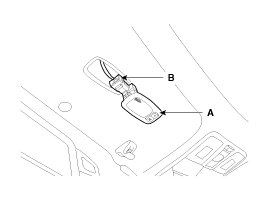
Using a screwdriver or remover, remove the vanity
lamp (A).
|
|
2. |
Disconnect the vanity lamp connector (B).
|
|
3. |
Installation is the reverse of removal.
|
• |
Make sure the connector is plugged
in properly.
|
|
• |
Replace any damage clips.
|
|
|
Roof Trim Replacement
| •
|
When prying with a flat-tip screwdriver,
wrap it with protective tape, and apply protective tape around
the related parts, to prevent damage.
|
| •
|
Put on gloves to protect your hands.
|
|
|
1. |
Remove the following items.
| A. |
Front seat
(Refer to the BD group - "Front Seat")
|
| B. |
Rear seat
(Refer to the BD group - "Rear Seat")
|
| G. |
Front pillar trim
(Refer to the BD group - " Interior Trim")
|
| H. |
Front door scuff trim & Rear door scuff trim
(Refer to the BD group - " Interior Trim")
|
| I. |
Center pillar lower trim & Center pillar
upper trim
(Refer to the BD group - " Interior Trim")
|
| J. |
Luggage side trim
(Refer to the BD group - " Interior Trim")
|
| K. |
Rear pillar trim
(Refer to the BD group - " Interior Trim")
|
|
|
2. |
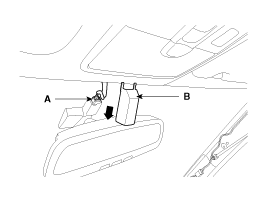
Remove the ECM mirror cover (B).
|
|
3. |
Disconnect the ECM mirror connector (A).
|
|
4. |
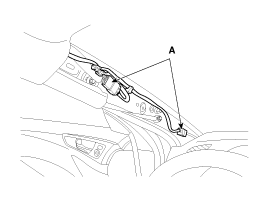
Disconnect the connector (A) and the mounting clips
in the front pillar.
|
|
5. |
Remove the clips and roof trim (A).
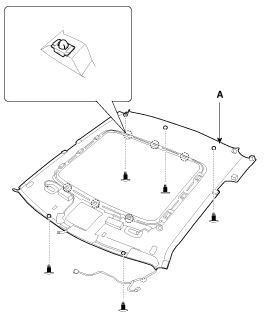
|
|
6. |
Installation is the reverse of removal.
|
• |
Make sure the connectors are plugged
in properly.
|
|
• |
Replace any damage clips.
|
|
|
Components
[General Type]
1. Roof trim
2. Retainer
3. Sunvisor
4. Assist handle
5. Assist handle bracket assembly
6. Garment hook assembly
7. ...
Components
[RH]
1. Front pillar trim
2. Center pillar lower trim
3. Center pillar upper trim
4. Rear pillar trim
5. Cowl side trim
6. Front door ...
 Hyundai Veloster: Roof Trim. Repair procedures
Hyundai Veloster 2011-2017 Service Manual / Body (Interior and Exterior) / Interior / Roof Trim. Repair procedures
 Roof Trim. Components and Components
Location
 Interior Trim. Components and Components
Location


