 Hyundai Veloster: Curtain Airbag (CAB) Module. Repair procedures
Hyundai Veloster 2011-2017 Service Manual / Restraint (Depowered) / Airbag Module / Curtain Airbag (CAB) Module. Repair procedures
Hyundai Veloster: Curtain Airbag (CAB) Module. Repair procedures
Hyundai Veloster 2011-2017 Service Manual / Restraint (Depowered) / Airbag Module / Curtain Airbag (CAB) Module. Repair procedures
Hyundai Veloster 2011-2017 Service Manual / Restraint (Depowered) / Airbag Module / Curtain Airbag (CAB) Module. Repair procedures
Removal
| 1. |
Disconnect the battery negative cable and wait for at least 3
minutes before beginning work.
|
| 2. |
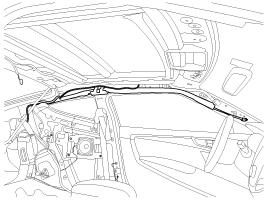
Remove the roof trim.
(Refer to the Body group - "Interior")
|
| 3. |
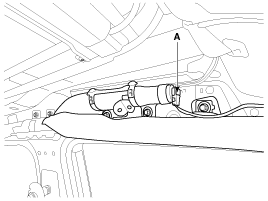
Disconnect the curtain airbag harness connector (A).
|
| 4. |
After loosening the mounting bolts remove the curtain airbag.
|
Installation
| 1. |
Remove the ignition key from the vehicle.
|
| 2. |
Disconnect the battery negative cable and wait for at least three
minutes.
|
| 3. |
Tighten the curtain airbag mounting bolts.
|
| 4. |
Connect the curtain airbag connector.
|
| 5. |
Install the roof trim.
(Refer to the Body group - "Interior")
|
| 6. |
Reconnect the battery negative cable.
|
| 7. |
After installing the curtain airbag (CAB), confirm proper system
operation:
|

 Airbag Module Disposal. Description and Operation
Airbag Disposal
Special tool required
Deployment tool 0957A-34100A
Before scrapping any airbags or side airbags (including those in a whole
vehicle to be scrapped), the airbag ...
See also:
Front Hub / Knuckle. Repair procedures
Replacement
1.
Loosen the wheel nuts slightly.
Raise the vehicle, and make sure it is securely supported.
2.
Remove the front wheel an ...
Curtain Airbag (CAB) Module. Description and Operation
Description
Curtain airbags are installed inside the headliner (LH and RH) and protect
the driver and passenger from danger when side crash occurs. The SRSCM determines
deployment of curtain ...
Troubleshooting
Troubleshooting
Symptom
Suspect Area
Remedy
Water leaks from panoramaroof
Deteriorated roof lid weatherstrip
Replace
...
Categories
- Hyundai Veloster Manuals Home
- Hyundai Veloster 2010-2017 Owner's Manual
- Hyundai Veloster 2010-2017 Service Manual

© 2011-2026 Copyright www.hvmanual.com