Replacement
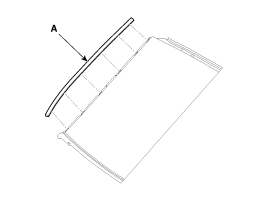
Roof Garnish Replacement
| •
|
When prying with a flat-tip screwdriver,
wrap it with protective tape, and apply protective tape around
the related parts, to prevent damage
|
| •
|
Put on gloves to protect your hands.
|
| •
|
Take care not to scratch the body surface.
|
|
|
1. |
Using a screwdriver or remover, remove the roof garnish
(A).
|
• |
Replace any damaged roof garnish.
|
|
|
|
2. |
Installation is the reverse of removal.
|
• |
Replace any damaged clips.
|
|
|
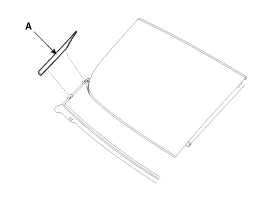
Roof Garnish Replacement
| •
|
When prying with a flat-tip screwdriver,
wrap it with protective tape, and apply protective tape around
the related parts, to prevent damage
|
| •
|
Put on gloves to protect your hands.
|
| •
|
Take care not to scratch the body surface.
|
|
|
1. |
Open the movable glass fully.
|
|
2. |
Using a screwdriver or remover, remove the roof garnish
(A).
|
• |
Replace any damaged roof garnish.
|
|
|
|
3. |
Installation is the reverse of removal.
|
• |
Replace any damaged clips.
|
|
|
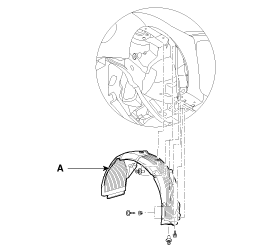
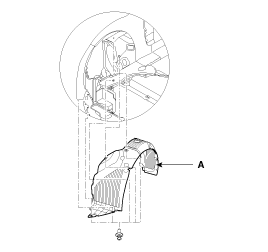
Front Wheel Guard Replacement
| •
|
When prying with a flat-tip screwdriver,
wrap it with protective tape, and apply protective tape around
the related parts, to prevent damage
|
| •
|
Put on gloves to protect your hands.
|
| •
|
Take care not to scratch the body surface.
|
|
|
1. |
Remove the front tire.
|
|
2. |
After loosening the mounting clips and screws, then
remove the front wheel guard (A).
[LH]
[RH]
|
|
3. |
Installation is the reverse of removal.
|
• |
Replace any damaged clips.
|
|
|
Rear Wheel Guard Replacement
| •
|
When prying with a flat-tip screwdriver,
wrap it with protective tape, and apply protective tape around
the related parts, to prevent damage
|
| •
|
Put on gloves to protect your hands.
|
| •
|
Take care not to scratch the body surface.
|
|
|
2. |
After loosening the mounting clips and screws, then
remove the rear wheel guard (A).
[LH]
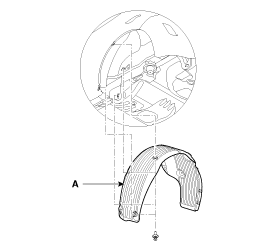
[RH]
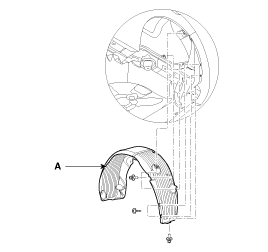
|
|
3. |
Installation is the reverse of removal.
|
• |
Replace any damaged clips.
|
|
|
Hood Garnish Replacement
| •
|
When prying with a flat-tip screwdriver,
wrap it with protective tape, and apply protective tape around
the related parts, to prevent damage
|
| •
|
Put on gloves to protect your hands.
|
| •
|
Take care not to scratch the body surface.
|
|
|
1. |
Remove the hood insulator pad.
(Refer to the BD group – “Hood�)
|
|
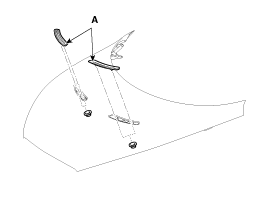
2. |
After loosening the mounting nuts, then remove the
hood garnish (A).
Tightening torque
:
3.9 ~ 4.4 N.m (0.4 ~ 0.45 kgf.m, 2.9 ~ 3.3
lb-ft)
|
|
|
3. |
Installation is the reverse of removal.
|
• |
Replace any damaged clips.
|
|
|
A Pillar Garnish Replacement
| •
|
When prying with a flat-tip screwdriver,
wrap it with protective tape, and apply protective tape around
the related parts, to prevent damage.
|
| •
|
Put on gloves to protect your hands.
|
| •
|
Take care not to scratch the body surface.
|
|
|
1. |
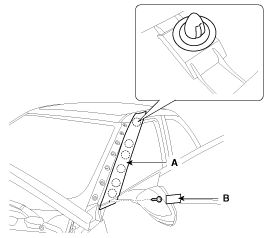
To remove the A pillar garnish (A), loosen the mounting
screw after removing the cap (B).
Tightening torque
:
0.5 ~ 1.0N.m (0.05 ~ 0.1kgf.m, 0.4 ~ 0.7
lb-ft)
|
|
|
2. |
Installation is the reverse of removal.
|
• |
Replace any damaged clips.
|
|
|
Quarter Fixed Glass & Molding Replacement
| •
|
When prying with a flat-tip screwdriver,
wrap it with protective tape, and apply protective tape around
the related parts, to prevent damage.
|
| •
|
Put on gloves to protect your hands.
|
| •
|
Take care not to scratch the body surface.
|
|
|
1. |
Remove the following items.
| A. |
Rear seat
(Refer to the BD group - "Rear Seat")
|
| B. |
Front seat belt lower anchor
(Refer to the BD group - "Front Seat Belt")
|
| C. |
Front door scuff trim
(Refer to the BD group - "Interior Trim")
|
| D. |
Center pillar lower trim
(Refer to the BD group - "Interior Trim")
|
| E. |
Center pillar upper trim
(Refer to the BD group - "Interior Trim")
|
| F. |
Luggage side trim
(Refer to the BD group - "Interior Trim")
|
| G. |
Rear pillar trim
(Refer to the BD group - "Interior Trim")
|
|
|
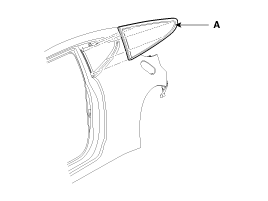
2. |
After loosening the mounting nuts, then remove the
quarter fixed glass & molding (A).
Tightening torque
:
3.9 ~ 4.4 N.m (0.4 ~ 0.45 kgf.m, 2.9 ~ 3.3
lb-ft)
|
|
|
3. |
Installation is the reverse of removal.
|
• |
Replace any damaged clips.
|
|
|
Rear Spoiler Replacement
| •
|
When prying with a flat-tip screwdriver,
wrap it with protective tape, and apply protective tape around
the related parts, to prevent damage.
|
| •
|
Put on gloves to protect your hands.
|
| •
|
Take care not to scratch the body surface.
|
|
|
1. |
Remove the following items.
| A. |
Tail gate frame upper trim & Tail gate center
trim
(Refer to the BD group - "Tail Gate")
|
| B. |
Tail gate trim
(Refer to the BD group - "Tail Gate")
|
| C. |
Tail gate frame side trim
(Refer to the BD group - "Tail Gate")
|
|
|
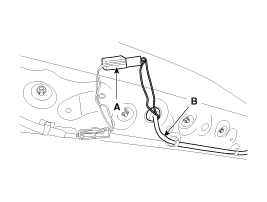
2. |
Disconnect the washer nozzle (B) and high mounted
stop lamp connector (A).
|
|
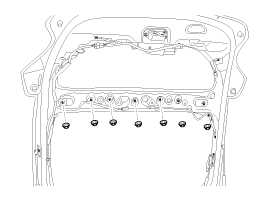
3. |
Loosen the rear spoiler mounting nuts.
Tightening torque :
5.9 ~ 6.4 N.m (0.6 ~ 0.65 kgf.m, 4.3 ~ 4.7
lb-ft)
|
|
|
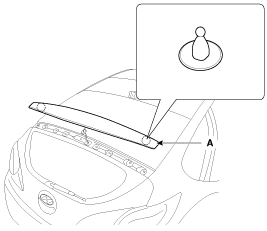
4. |
Remove the rear spoiler (A).
|
|
5. |
Installation is the reverse of removal.
|
• |
Make sure the connector are connected
in properly.
|
|
• |
Replace any damaged clips.
|
|
|
Replacement
Door Trim Replacement
•
Take care not to scratch the door trim and
other par ...
Components
1. Movable glass assembly
2. Wind deflector assembly
3. Mechanism rail assembly
4. Panoramaroof frame assembly
5. Roller blind support lower assembly
6. R ...
See also:
SRS Control Module (SRSCM). Repair procedures
Removal
1.
Remove the ignition key from the vehicle.
2.
Disconnect the battery negative cable and wait for at least three
minutes before b ...
Components and Components Location
Component Location
1. Hood switch
2. Burglar horn
3. IPM (BCM) and RF antenna
4. Key warning switch
5. Front door switch
6. Front door lock actuator & sw ...
Smooth cornering
Avoid braking or gear changing in corners, especially when roads are wet. Ideally,
corners should always be taken under gentle acceleration. If you follow these suggestions,
tire wear will be he ...

 Hyundai Veloster: Body Side Moldings. Repair procedures
Hyundai Veloster 2011-2017 Service Manual / Body (Interior and Exterior) / Exterior / Body Side Moldings. Repair procedures
Hyundai Veloster: Body Side Moldings. Repair procedures
Hyundai Veloster 2011-2017 Service Manual / Body (Interior and Exterior) / Exterior / Body Side Moldings. Repair procedures


 Rear Door. Repair procedures
 Panoramaroof. Components and Components
Location
Panoramaroof. Components and Components
Location