 Hyundai Veloster: Child restraint system
Hyundai Veloster 2011-2017 Owner's Manual / Safety features of your vehicle / Child restraint system
Hyundai Veloster: Child restraint system
Hyundai Veloster 2011-2017 Owner's Manual / Safety features of your vehicle / Child restraint system
Children riding in the car should sit in the rear seat and must always be properly restrained to minimize the risk of injury in an accident, sudden stop or sudden maneuver. According to accident statistics, children are safer when properly restrained in the rear seats than in the front seat. Larger children not in a child restraint should use one of the seat belts provided.
You should be aware of the specific requirements in your state. Child and/or infant safety seats must be properly placed and installed in the rear seat.You must use a commercially available child restraint system that meets the requirements of the Federal Motor Vehicle Safety Standards (FMVSS).
Child restraint systems are designed to be secured in vehicle seats by lap belts or the lap belt portion of a lap/shoulder belt, or by a LATCH system (if equipped). Children could be injured or killed in a crash if their restraints are not properly secured. For small children and babies, a child seat or infant seat must be used. Before buying a particular child restraint system, make sure it fits your car seat and seat belts, and fits your child. Follow all the instructions provided by the manufacturer when installing the child restraint system.
WARNING
- • A child restraint system must be placed in the rear seat. Never install a child or infant seat on the front passenger's seat. Should an accident occur and cause the passenger-side air bag to deploy, it could severely injure or kill an infant or child seated in an infant or child seat. Thus only use a child restraint in the rear seat of your vehicle.
- • A seat belt or child restraint system can become very hot if it is left in a closed vehicle on a sunny day, even if the outside temperature does not feel hot. Be sure to check the seat cover and buckles before placing a child there.
- • When the child restraint system is not in use, store it in the luggage area or fasten it with a seat belt so that it will not be thrown forward in the case of a sudden stop or an accident.
- • Children may be seriously injured or killed by an inflating air bag. All children, even those too large for child restraints, must ride in the rear seat.
WARNING
To reduce the chance of serious or fatal injuries:
- • Children of all ages are safer when restrained in the rear seat. A child riding in the front passenger seat can be forcefully struck by an inflating air bag resulting in serious or fatal injuries.
- • Always follow the child restraint system manufacturer’s instructions for installation and use of the child restraint.
- • Always make sure the child seat is secured properly in the car and your child is securely restrained in the child seat.
- • Never hold a child in your arms or lap when riding in a vehicle. The violent forces created during a crash will tear the child from your arms and throw the child against the car’s interior.
- • Never put a seat belt over yourself and a child. During a crash, the belt could press deep into the child causing serious internal injuries.
- • Never leave children unattended in a vehicle – not even for a short time. The car can heat up very quickly, resulting in serious injuries to children inside. Even very young children may inadvertently cause the vehicle to move, entangle themselves in the windows, or lock themselves or others inside the vehicle.
- • Never allow two children, or any two persons, to use the same seat belt.
- • Children often squirm and reposition themselves improperly. Never let a child ride with the shoulder belt under their arm or behind their back. Always properly position and secure children in the rear seat.
- • Never allow a child to stand-up or kneel on the seat or floor of a moving vehicle. During a collision or sudden stop, the child can be violently thrown against the vehicle’s interior, resulting in serious injury.
- • Never use an infant carrier or a child safety seat that "hooks" over a seatback, it may not provide adequate security in an accident.
- • Seat belts can become very hot, especially when the car is parked in direct sunlight. Always check seat belt buckles before fastening them over a child.
- • After an accident, have an authorized HYUNDAI dealer check the child restraint system, seat belt, tether anchor and lower anchor.
- • If there is not enough space to place the child restraint system because of the driver's seat, install the child restraint system in the rear right seat.
Using a child restraint system
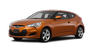
For small children and babies, the use of a child seat or infant seat is required. This child seat or infant seat should be of appropriate size for the child and should be installed in accordance with the manufacturer's instructions.
For safety reasons, we recommend that the child restraint system be used in the rear seats.
WARNING
Never place a rear-facing child restraint in the front passenger seat, because of the danger that an inflating passenger-side air bag could impact the rear-facing child restraint and kill the child.
Since all passenger seat belts move freely under normal conditions and only lock under extreme or emergency conditions (emergency locking mode), you must manually change these seat belts to the automatic locking mode to secure a child restraint.
WARNING - Child seat installation
- • A child can be seriously injured or killed in a collision if the child restraint is not properly anchored to the vehicle and the child is not properly restrained in the child restraint. Before installing the child restraint system, read the instructions supplied by the child restraint system manufacturer.
- • If the seat belt does not operate as described in this section, have the system checked immediately by your authorized HYUNDAI dealer.
- • Failure to observe this manual's instructions regarding child restraint systems and the instructions provided with the child restraint system could increase the chance and/or severity of injury in an accident.
Placing a passenger seat belt into the automatic locking mode
The automatic locking mode will help prevent the normal movement of the child in the vehicle from causing the seat belt to loosen and compromise the child restraint system. To secure a child restraint system, use the following procedure.
To install a child restraint system on the outboard or center rear seats, do the following:
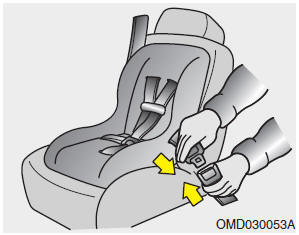
1. Place the child restraint system in the seat and route the lap/shoulder belt
around or through the restraint, following the restraint manufacturer’s instructions.
Be sure the seat belt webbing is not twisted.
2. Fasten the lap/shoulder belt
latch into the buckle. Listen for the distinct “click” sound.
Position the release button so that it is easy to access in case of an emergency.

3. Pull the shoulder portion of the seat belt all the way out. When the shoulder portion of the seat belt is fully extended, it will shift the retractor to the “Automatic locking” (child restraint) mode.
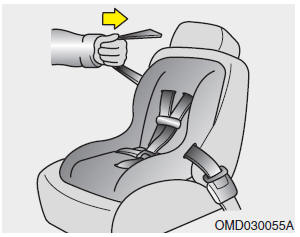
4. Slowly allow the shoulder portion of the seat belt to retract and listen for an audible “clicking” or “ratcheting” sound. This indicates that the retractor is in the “automatic locking” mode. If no distinct sound is heard, repeat steps 3 and 4.
5. Remove as much slack from the belt as possible by pushing down on the child
restraint system while feeding the shoulder belt back into the retractor.
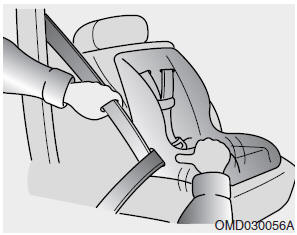
6. Push
and pull on the child restraint system to confirm that the seat belt is holding
it firmly in place. If it is not, release the seat belt and repeat steps 2 through
6.
7. Double check that the retractor is in the “Automatic locking” mode by attempting
to pull more of the seat belt out of the retractor. If you cannot, the retractor
is in the “Automatic locking” mode.
To remove the child restraint, press the release button on the buckle and then pull the lap/shoulder belt out of the restraint and allow the seat belt to retract fully.
WARNING - Automatic locking mode
The lap/shoulder belt automatically returns to the “emergency lock mode” whenever the belt is allowed to retract fully. Therefore, the preceding seven steps must be followed each time a child restraint is installed.
If the retractor is not in the Automatic Locking mode, the child restraint can move when your vehicle turns or stops suddenly. A child can be seriously injured or killed if the child restraint is not properly anchored to the car, including setting the retractor to the Automatic Locking mode.
When the seat belt is allowed to retract to its fully stowed position, the retractor will automatically switch from the “Automatic locking” mode to the emergency lock mode for normal adult usage.
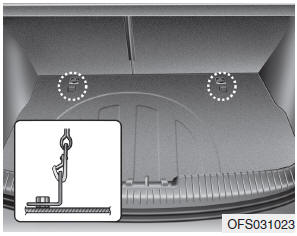
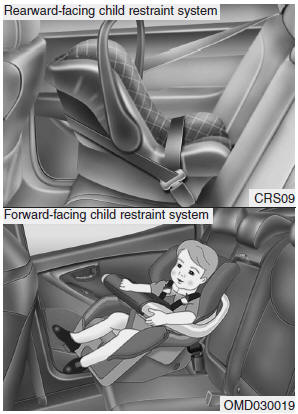
Securing a child restraint seat with “Tether Anchor” system
Child restraint hook holders are located on the luggage room.
1. Route the child restraint seat strap over the seatback.
For vehicles with adjustable headrest, route the tether strap under the headrest and between the headrest posts, otherwise route the tether strap over the top of the seatback.
2. Connect the tether strap hook to the appropriate child restraint hook holder and tighten to secure the seat.
WARNING
A child can be seriously injured or killed in a collision if the child restraint is not properly anchored to the car and the child is not properly restrained in the child restraint. Always follow the child seat manufacturer’s instructions for installation and use.
WARNING - Tether strap
Never mount more than one child restraint to a single tether anchor or to a single lower anchorage point. The increased load caused by multiple seats may cause the tethers or anchorage points to break, causing serious injury or death.
WARNING - Child restraint check
Check that the child restraint system is secure by pushing and pulling it in different directions. Incorrectly fitted child restraints may swing, twist, tip or separate causing death or serious injury.
WARNING - Child restraint anchorage
- • Child restraint anchorages are designed to withstand only those loads imposed by correctly fitted child restraints. Under no circumstances are they to be used for adult seat belts or harnesses or for attaching other items or equipment to the vehicle.
- • The tether strap may not work properly if attached somewhere other than the correct tether anchor.
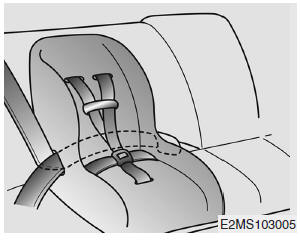
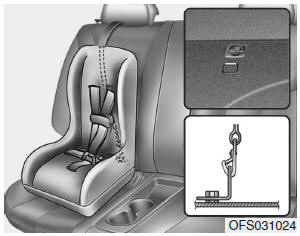
Securing a child restraint seat with child seat lower anchor system
Some child seat manufacturers make child restraint seats that are labeled as LATCH or LATCH-compatible child restraint seats. LATCH stands for "Lower Anchors and Tethers for Children". These seats include two rigid or webbing mounted attachments that connect to two LATCH anchors at specific seating positions in your vehicle. This type of child restraint seat eliminates the need to use seat belts to attach the child seat in the rear seats.
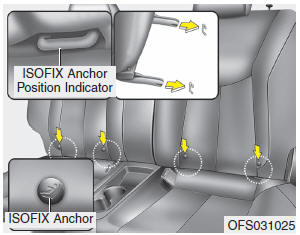
Child restraint symbols are located on the left and right rear seat backs to indicate the position of the lower anchors for child restraints.
WARNING
- • When using the vehicle's "LATCH" system to install a child restraint system in the rear seat, all unused vehicle rear seat belt metal latch plates or tabs must be latched securely in their seat belt buckles and the seat belt webbing must be retracted behind the child restraint to prevent the child from reaching and taking hold of unretracted seat belts. Unlatched metal latch plates or tabs may allow the child to reach the unretracted seat belts which may result in strangulation and a serious injury or death to the child in the child restraint.
- • Do not place anything around the lower anchors. Also make sure that the seat belt is not caught in the lower anchors.
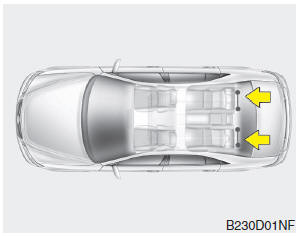
LATCH anchors have been provided in your vehicle. The LATCH anchors are located in the left and right outboard rear seating positions. Their locations are shown in the illustration. There is no LATCH anchor provided for the center rear seating position.
The LATCH anchors are located between the seatback and the seat cushion of the rear seat left and right outboard seating positions.
Follow the child seat manufacturer’s instructions to properly install child restraint seats with LATCH or LATCHcompatible attachments.
Once you have installed the LATCH child restraint, assure that the seat is properly attached to the LATCH and tether anchors.
Also, test the child restraint seat before you place the child in it. Tilt the seat from side to side. Also try to tug the seat forward. Check to see if the anchors hold the seat in place.
CAUTION
Do not allow the rear seat belt webbing to get scratched or pinched by the child-seat latch and LATCH anchor during the installation.
WARNING
If the child restraint is not anchored properly, the risk of a child being seriously injured or killed in a collision greatly increases.
WARNING - LATCH lower anchors
LATCH lower anchors are only to be used with the left and right rear outboard seating positions. Never attempt to attach a LATCH equipped seat in the center seating position. You may damage the anchors or the anchors may fail and break in a collision.
 Care of seat belts
Seat belt systems should never be disassembled or modified. In addition, care
should be taken to assure that seat belts and belt hardware are not damaged by seat
hinges, doors or other abuse.
WAR ...
 Air bag - advanced supplemental restraint system
(1) Driver’s front air bag (2) Passenger’s front air bag (3) Side impact
air bag (4) Curtain air bag
WARNING
Even in vehicles with air bags, you and your passengers must always wear the
se ...
See also:
Specifications
Specifications
Model
D6GF1
Engine
Gasoline 1.6 GDI
Shift ratio
1st
3.615
2nd
1 ...
Windows
(1) Driver’s door power window switch (2) Front passenger’s door power window
switch (3) Rear door (right) power window switch* (4) Window opening and closing
(5) Automatic power window* (6) ...
To connect using the phone settings
Your phone's Bluetooth feature may be set to off by default. To use the Bluetooth
feature, Bluetooth must be turned on in your phone. Refer to your phone's user guide.
1. Enable the phone&# ...
Categories
- Hyundai Veloster Manuals Home
- Hyundai Veloster 2010-2017 Owner's Manual
- Hyundai Veloster 2010-2017 Service Manual
