 Hyundai Veloster: AVN Head Unit. Repair procedures
Hyundai Veloster 2011-2017 Service Manual / Body Electrical System / AVN System / AVN Head Unit. Repair procedures
Hyundai Veloster: AVN Head Unit. Repair procedures
Hyundai Veloster 2011-2017 Service Manual / Body Electrical System / AVN System / AVN Head Unit. Repair procedures
Hyundai Veloster 2011-2017 Service Manual / Body Electrical System / AVN System / AVN Head Unit. Repair procedures
Removal
AVN Head Unit
|
| 1. |
Disconnect the negative (-) battery terminal.
|
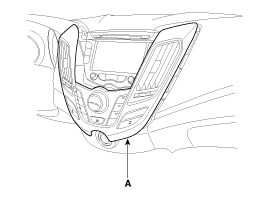
| 2. |
Remove the center fascia panel (A).
|
| 3. |
Disconnect the connectors (A) from center fascia panel.
|
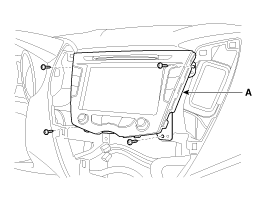
| 4. |
Remove the AVN head unit assembly (A), after loosening the 4 screws.
|
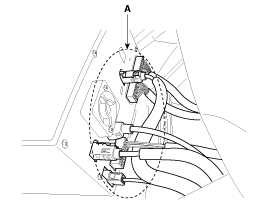
| 5. |
Disconnect the AVN head unit connectors and antenna cables (A),
then remove the AVN head unit.
|
External Amplifier
| 1. |
Remover the assistant seat.
(Refer to the BD group - "Seat - Front seat")
|
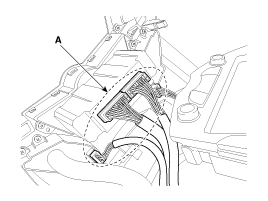
| 2. |
Disconnect the external amplifier connector.
|
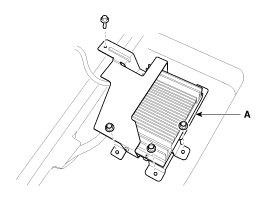
| 3. |
Loosen a bolt and 3 nuts, then remove the external amplifier (A).
|
Installation
AVN Head Unit
| 1. |
Connect the AVN head unit connectors and cables.
|
| 2. |
Install the AVN head unit.
|
| 3. |
Install the center fascia upper panel.
|
| 4. |
Connect the negative (-) battery terminal.
|
External Amplifier
| 1. |
Connect the connector and install the external amplifier.
|
| 2. |
Install the assistant seat.
|
 AVN Head Unit. Components and Components Location
Components
AVN (A/V & Navigation) Head Unit Connector
...
 Speakers. Repair procedures
Inspection
1.
Troubleshooting for Speaker
(1)
Basic inspection of speaker
Inspect the sound from speaker after verifying that ...
See also:
Resetting the sunroof
Whenever the vehicle battery is disconnected or discharged, you must reset your
sunroof system as follows:
1. Turn the ignition switch to the ON position. 2. Close the sunroof. 3.
Release the sun ...
Front Driveshaft. Components and Components
Location
Component location
1. Driveshaft (RH)
2. Driveshaft (LH)
3. Circlip
Components
[RH]
1. BJ assembly
2. Circlip
...
Troubleshooting
Troubleshooting Guide
Before Thinking The Product Has Malfunctioned
1.
Errors which occur during the operation or installation of the
device may be mistaken as a malfu ...
Categories
- Hyundai Veloster Manuals Home
- Hyundai Veloster 2010-2017 Owner's Manual
- Hyundai Veloster 2010-2017 Service Manual

© 2011-2026 Copyright www.hvmanual.com