 Hyundai Veloster: Side Impact Sensor (SIS). Repair procedures
Hyundai Veloster 2011-2017 Service Manual / Restraint (Advanced) / SRSCM / Side Impact Sensor (SIS). Repair procedures
Hyundai Veloster: Side Impact Sensor (SIS). Repair procedures
Hyundai Veloster 2011-2017 Service Manual / Restraint (Advanced) / SRSCM / Side Impact Sensor (SIS). Repair procedures
Hyundai Veloster 2011-2017 Service Manual / Restraint (Advanced) / SRSCM / Side Impact Sensor (SIS). Repair procedures
Removal
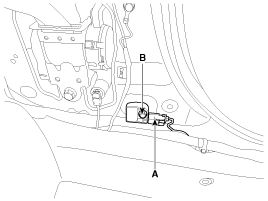
| Pressure Side Impact Sensor |
|
| 1. |
Disconnect the battery negative cable, and wait for at least three
minutes before beginning work.
|
| 2. |
Remove the front door trim.
(Refer to the Body group - "Front door")
|
| 3. |
Disconnect the pressure side impact sensor connector (A) and remove
the pressure side impact sensor mounting screws (B).
|
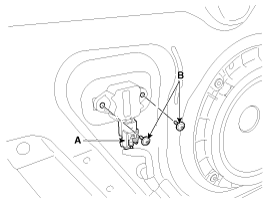
Side Impact Sensor
| 1. |
Disconnect the battery negative cable and wait for at least three
minutes before beginning work.
|
| 2. |
Remove the door scuff trim.
(Refer to the Body group - "Interior trim")
|
| 3. |
Remove the center pillar trim.
(Refer to the Body group - "Interior trim")
|
| 4. |
Disconnect the side impact sensor connector (A).
|
| 5. |
Loosen the side impact sensor mounting bolt (B) and remove the
side impact sensor.
|
Installation
| Pressure Side Impact Sensor |
| 1. |
Install the new pressure side impact sensor with the screws (B)
then connect the pressure side impact sensor connector (A).
|
| 2. |
Install the front door trim.
(Refer to the Body group - "Front door")
|
| 3. |
Reconnect the battery negative cable.
|
| 4. |
After installing the pressure side impact sensor, confirm proper
system operation:
|
Side Impact Sensor
|
| 1. |
Install the new side impact sensor with the bolt (B) then connect
the side impact sensor connector (A).
|
| 2. |
Install the center pillar trim.
(Refer to the Body group - "Interior tirm")
|
| 3. |
Install the door scuff trim.
(Refer to the Body group - "Interior tirm")
|
| 4. |
Reconnect the battery negative cable.
|
| 5. |
After installing the Side Impact Sensor, confirm proper system
operation:
|
 Side Impact Sensor (SIS). Components and Components Location
Components
...
 Seat Belt Buckle Switch (BS). Description and Operation
Description
The SRSCM shall monitor the status of the driver and front passenger seat
belt buckle. The SRSCM provides one pin each for the driver and front passenger
seat belt buckle status ...
See also:
Changing the coolant
Have coolant changed by an authorized HYUNDAI dealer according to the Maintenance
Schedule at the beginning of this section.
CAUTION
Put a thick cloth or fabric around the radiator cap before refi ...
Parking brake
Checking the parking brake
Check the stroke of the parking brake by counting the number of “clicks’’ heard
while fully applying it from the released position. Also, the parking brake alone ...
Refrigerant label
The refrigerant label is located on the underside of the hood. ...
Categories
- Hyundai Veloster Manuals Home
- Hyundai Veloster 2010-2017 Owner's Manual
- Hyundai Veloster 2010-2017 Service Manual

© 2011-2026 Copyright www.hvmanual.com