 Hyundai Veloster: Repair procedures
Hyundai Veloster 2011-2017 Service Manual / Body Electrical System / Keyless Entry And Burglar Alarm / Repair procedures
Hyundai Veloster: Repair procedures
Hyundai Veloster 2011-2017 Service Manual / Body Electrical System / Keyless Entry And Burglar Alarm / Repair procedures
Hyundai Veloster 2011-2017 Service Manual / Body Electrical System / Keyless Entry And Burglar Alarm / Repair procedures
Inspection
Front Door Lock Actuator Inspection
| 1. |
Remove the front door trim.
(Refer to the BD group - "Front door")
|
| 2. |
Remove the front door module.
|
| 3. |
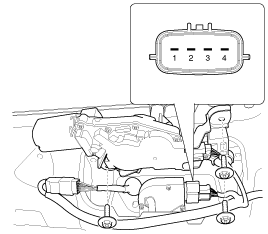
Disconnect the 7P connector from the actuator.
|
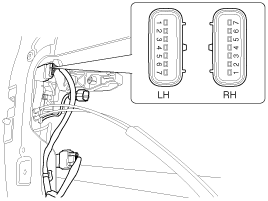
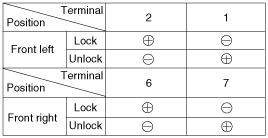
| 4. |
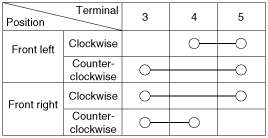
Check actuator operation by connecting power and ground according
to the table. To prevent damage to the actuator, apply battery voltage
only momentarily.
|
Rear Door Lock Actuator Inspection
| 1. |
Remove the rear door trim.
(Refer to the BD group - "Rear door")
|
| 2. |
Remove the rear door module.
|
| 3. |
Disconnect the 7P connector from the actuator.
|
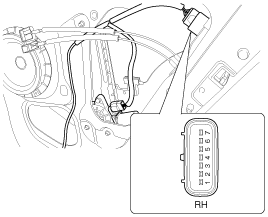
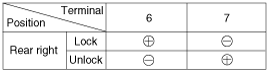
| 4. |
Check actuator operation by connecting power and ground according
to the table. To prevent damage to the actuator, apply battery voltage
only momentarily.
|
Tailgate Release Actuator Inspection
| 1. |
Remove the tailgate trim panel.
(Refer to the BD group - "Tailgate")
|
| 2. |
Disconnect the 4P connector from the actuator.
|
| 3. |
Check actuator operation by connecting power and ground according
to the table. To prevent damage to the actuator, apply battery voltage
only momentarily.
|

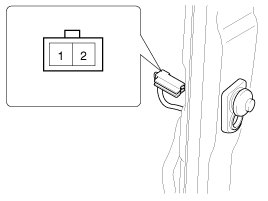
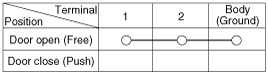
Front Door Lock Switch Inspection
| 1. |
Remove the front door trim panel.
(Refer to the BD group - "Front door")
|
| 2. |
Remove the front door module.
|
| 3. |
Disconnect the 7P connector from the actuator.
|
| 4. |
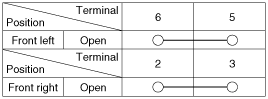
Check for continuity between the terminals in each switch position
when inserting the key into the door according to the table.
|
Rear Door Lock Switch Inspection
| 1. |
Remove the rear door trim panel.
(Refer to the BD group - "Rear door")
|
| 2. |
Remove the rear door module.
|
| 3. |
Disconnect the 7P connector from the actuator.
|
| 4. |
Check for continuity between the terminals in each switch position
according to the table.
|

Tailgate Open Switch Inspection
| 1. |
Remove the tailgate trim.
(Refer to the BD group - "Tailgate")
|
| 2. |
Disconnect the 4P connector from the actuator.
|
| 3. |
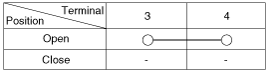
Check for continuity between the terminals in each switch position
according to the table.
|
Door Switch Inspection
Remove the door switch and check for continuity between the terminals.
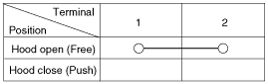
Hood Switch Inspection
| 1. |
Disconnect the connector from the hood switch (A).
|
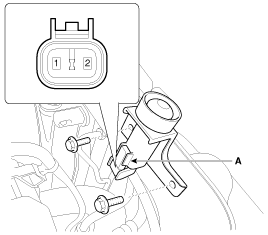
| 2. |
Check for continuity between the terminals and ground according
to the table.
|
Burglar Horn Inspection
| 1. |
Remove the burglar horn (A) after removing 1 bolt and disconnect
the 2P connector from the burglar horn.
|
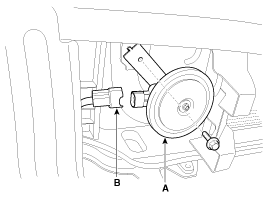
| 2. |
Test the burglar horn by connecting battery power to the terminal
1 and ground the terminal 2.
|
| 3. |
The burglar horn should make a sound. If the burglar horn fails
to make a sound replace it.
|
 Description and Operation
Description
Burglar Alarm System
The burglar alarm system is armed automatically after the doors, hood,
and trunk lid are closed and locked with keyless transmitter.
The system is s ...
 Transmitter. Repair procedures
Inspection
1.
Check that the red light flickers when the door lock or unlock
button is pressed on the transmitter.
2.
Remove the battery ( ...
See also:
Fuel Tank Pressure Sensor (FTPS). Specifications
Specification
Pressure [kPa (kgf/cm², in H2O)
Output Voltage (V)
-6.67 (-0.068, -26.8)
0.5
0
2.5
...
Repair procedures
Removal
Back View Camera
1.
Disconnect the negative(-) battery terminal.
2.
Remove the tailgate outside handle assembly.
(Refer to ...
Hands Free Switch. Repair procedures
Inspection
1.
Check the hands free remote control switch for resistance between
terminals in each switch position.
Switch
...
Categories
- Hyundai Veloster Manuals Home
- Hyundai Veloster 2010-2017 Owner's Manual
- Hyundai Veloster 2010-2017 Service Manual

© 2011-2026 Copyright www.hvmanual.com