 Hyundai Veloster: Repair procedures
Hyundai Veloster 2011-2017 Service Manual / Engine Electrical System / Starting System / Repair procedures
Hyundai Veloster: Repair procedures
Hyundai Veloster 2011-2017 Service Manual / Engine Electrical System / Starting System / Repair procedures
Troubleshooting Starter Circuit
The battery must be in good condition and fully charged.
|
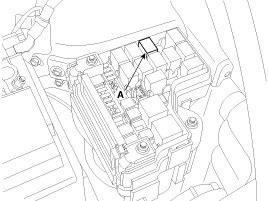
| 1. |
Remove the fuel pump relay (A) from the fuse box.
|
| 2. |
With the shift lever in N or P (A/T) or clutch pedal pressed (M/T),
turn the ignition switch to "START".
If the starter normally cranks the engine, starting system is
OK. If the starter will not crank the engine at all, go to next step.
If it won't disengage from the ring gear when you release key,
check for the following until you find the cause.
|
| 3. |
Check the battery condition. Check electrical connections at the
battery, battery negative cable connected to the body, engine ground
cables, and the starter for looseness and corrosion. Then try starting
the engine again.
If the starter cranks the engine normally, repairing the loose
connection repaired the problem. The starting system is now OK.
If the starter still does not crank the engine, go to next step.
|
| 4. |
Disconnect the connector from the S-terminal of solenoid. Connect
a jumper wire from the B-terminal of solenoid to the S-terminal of solenoid.
If the starter cranks the engine, go to next step.
If the starter still does not crank the engine, remove the starter,
and repair or replace as necessary.
|
| 5. |
Check the following items in the order listed until you find the
open circuit.
|
Starter Solenoid Test
| 1. |
Disconnect the field coil wire from the M-terminal of solenoid
switch.
|
| 2. |
Connect the battery as shown. If the starter pinion pops out (engages),
it is working properly. To avoid damaging the starter, do not leave
the battery connected for more than 10 seconds.
|

| 3. |
Disconnect the battery from the M terminal.
If the pinion does not retract, the hold-in coil is working properly.
To avoid damaging the starter, do not leave the battery connected for
more than 10 seconds.
|
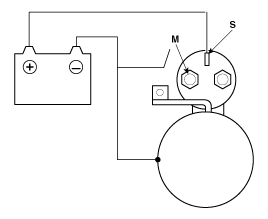
| 4. |
Disconnect the battery also from the body. If the pinion retracts
immediately, it is working properly. To avoid damaging the starter,
do not leave the battery connected for more than 10 seconds.
|

Free Running Test
| 1. |
Place the starter motor in a vise equipped with soft jaws and
connect a fully-charged 12-volt battery to starter motor as follows.
|
| 2. |
Connect a test ammeter (150-ampere scale) and carbon pile rheostats
as shown in the illustration.
|
| 3. |
Connect a voltmeter (15-volt scale) across starter motor.
|
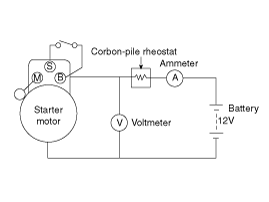
| 4. |
Rotate carbon pile to the off position.
|
| 5. |
Connect the battery cable from battery's negative post to the
starter motor body.
|
| 6. |
Adjust until battery voltage shown on the voltmeter reads 11.5volts.
|
| 7. |
Confirm that the maximum amperage is within the specifications
and that the starter motor turns smoothly and freely.
|
 Description and Operation
Description
The starting system includes the battery, starter, solenoid switch, ignition
switch, inhibitor switch (A/T), ignition lock switch, connection wires and the
battery cable.
Whe ...
 Starter
Components and Components Location
Components
1. Screw
2. Front bracket
3. Stop ring
4. Stopper
5. Overrun clutch
6. Lever
7. Lever plate
8. Lever packing
9. ...
See also:
Front Hub / Knuckle. Repair procedures
Replacement
1.
Loosen the wheel nuts slightly.
Raise the vehicle, and make sure it is securely supported.
2.
Remove the front wheel an ...
Airbag Module Disposal. Description and Operation
Airbag Disposal
Special tool required
Deployment tool 0957A-34100A
Before scrapping any airbags or side airbags (including those in a whole
vehicle to be scrapped), the airbag ...
Manifold Absolute Pressure Sensor (MAPS). Description and Operation
Description
Manifold Absolute Pressure Sensor (MAPS) is a speed-density type sensor
and is installed on the surge tank. It senses absolute pressure of the surge
tank and transfers the analog ...
Categories
- Hyundai Veloster Manuals Home
- Hyundai Veloster 2010-2017 Owner's Manual
- Hyundai Veloster 2010-2017 Service Manual
