 Hyundai Veloster: Front Stabilizer Bar. Repair procedures
Hyundai Veloster 2011-2017 Service Manual / Suspension System / Front Suspension System / Front Stabilizer Bar. Repair procedures
Hyundai Veloster: Front Stabilizer Bar. Repair procedures
Hyundai Veloster 2011-2017 Service Manual / Suspension System / Front Suspension System / Front Stabilizer Bar. Repair procedures
Hyundai Veloster 2011-2017 Service Manual / Suspension System / Front Suspension System / Front Stabilizer Bar. Repair procedures
Replacement
| 1. |
Remove the front wheel & tire.
|

| 2. |
Disconnect the stabilizer link with the front strut assembly after
loosening the nut.
|
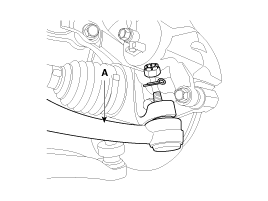
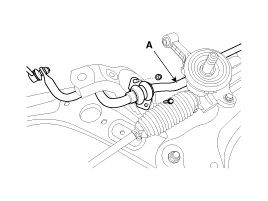
| 3. |
Loosen the nut and then remove the tie-rod end (A) with the front
axle.
|
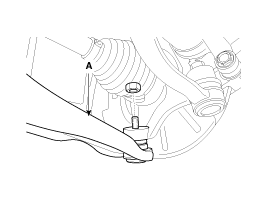
| 4. |
Loosen the nut and then remove the lower arm (A).
|
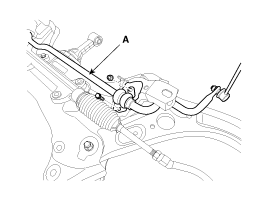
| 5. |
Loosen the bolt (A) and then disconnect the universal joint assembly
from the pinion of the steering gear box.
|
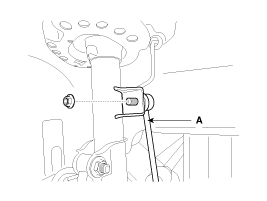
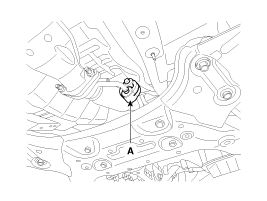
| 6. |
Remove the rubber hanger (A).
|
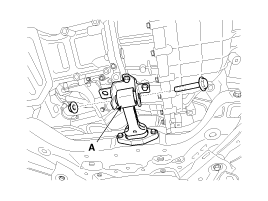
| 7. |
Loosen the roll rod (A) mounting bolts and nuts.
|
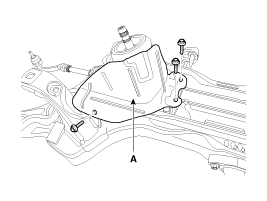
| 8. |
Loosen the bolts & nuts and then remove the front sub frame (A).
|
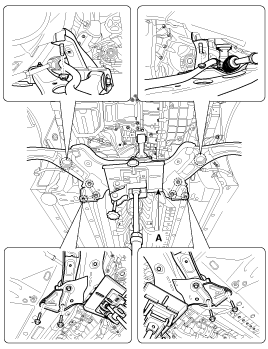
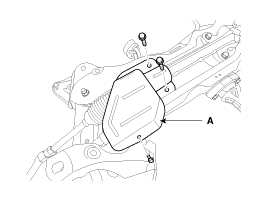
| 9. |
Remove the protecter (A).
[LHD]
[RHD]
|
| 10. |
Remove the stabilizer (A) from the front sub frame by loosening
the mounting bolts & nuts.
|
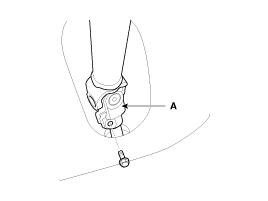
| 11. |
Disconnect the stabilizer link (A) with the stabilizer bar by
loosening the nut.
|
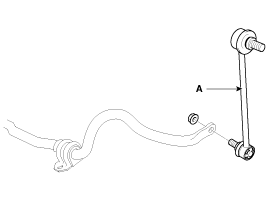
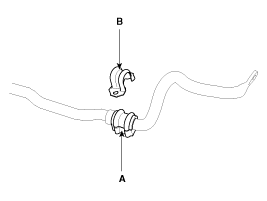
| 12. |
Remove the bushing (A) and the clamp (B) from the stabilizer bar.
|
| 13. |
Installation is the reverse of removal.
|
| 14. |
Check the wheel alignment.
(Refer to SS group - "Tires/Wheels")
|
Inspection
| 1. |
Check the bushing for wear and deterioration.
|
| 2. |
Check the front stabilizer bar for deformation.
|
| 3. |
Check the front stabilizer link ball joint for damage.
|
 Front Lower Arm. Repair procedures
Replacement
1.
Remove the front wheel & tire.
Tightening torque :
88.3 ~ 107.9N.m(9.0 ~ 11.0kgf.m, 65.1 ~ 79.6lb-ft)
...
 Sub Frame. Repair procedures
Replacement
1.
Remove the front wheel & tire.
Tightening torque :
88.3 ~ 107.9N.m(9.0 ~ 11.0kgf.m, 65.1 ~ 79.6lb-ft)
...
See also:
Driving your vehicle
WARNING - ENGINE EXHAUST CAN BE DANGEROUS!
Engine exhaust fumes can be extremely dangerous. If, at any time, you smell
exhaust fumes inside the vehicle, open the windows immediately.
• Do not in ...
Schematic Diagrams
Schematic Diagram
...
Automatic turn off function
The interior lights automatically turn off approximately 20 minutes after the
ignition switch is turned off.
If your vehicle is equipped with the theft alarm system, the interior lights
automatic ...
Categories
- Hyundai Veloster Manuals Home
- Hyundai Veloster 2010-2017 Owner's Manual
- Hyundai Veloster 2010-2017 Service Manual

© 2011-2026 Copyright www.hvmanual.com