 Hyundai Veloster: Battery Sensor
Hyundai Veloster 2011-2017 Service Manual / Engine Electrical System / Charging System / Battery Sensor
Hyundai Veloster: Battery Sensor
Hyundai Veloster 2011-2017 Service Manual / Engine Electrical System / Charging System / Battery Sensor
Hyundai Veloster 2011-2017 Service Manual / Engine Electrical System / Charging System / Battery Sensor
Description and Operation
Description
Vehicles have many control units that use more electricity. These units
control their own system based on information from diverse sensors. It is important
to have a stable power supply as there diverse sensors giving a variety of information.
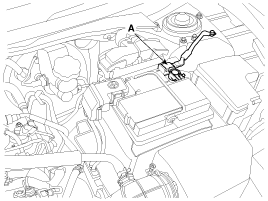
Battery sensor (A) is mounted on battery (-) terminal. It transmits battery
voltage, current, temperature information to ECM. ECM controls generating voltage
by duty cycle based on these signals.
When battery sensor signal fault occurs, inspect the vehicle parasitic
draw in advance after inspecting the sensor because the sensor will
behave abnormally when the parasitic draw is more than 100mA. (Refer
to vehicle parasitic current inspection)
|
It takes a few hours for a new battery sensor to detect the battery
state correctly.
Perform the following process after replacing the battery sensor.
|
For the vehicle equipped with a battery sensor, be careful not
to damage the battery sensor when the battery is replaced or recharged.
|
 Repair procedures
Removal and Installation
1.
Remove the battery.
(1)
Disconnect the battery terminals (A).
Tightening ...
 Starting System
...
See also:
Air bag warning label
Air bag warning labels, some required by the U.S. National Highway Traffic Safety
Administration (NHTSA), are attached to alert the driver and passengers of potential
risks of the air bag system ...
Repair procedures
Inspection
Manual Transaxle Oil
Inspection
1.
Park the vehicle on a level ground and stop the engine.
2.
Retighten the o ...
Passenger Airbag (PAB) Module. Components and Components Location
Components
...
Categories
- Hyundai Veloster Manuals Home
- Hyundai Veloster 2010-2017 Owner's Manual
- Hyundai Veloster 2010-2017 Service Manual

© 2011-2026 Copyright www.hvmanual.com